Hexo|快速搭建自己(Github)博客
一、准备工作
二、申请 github 博客
1.创建 github 仓库
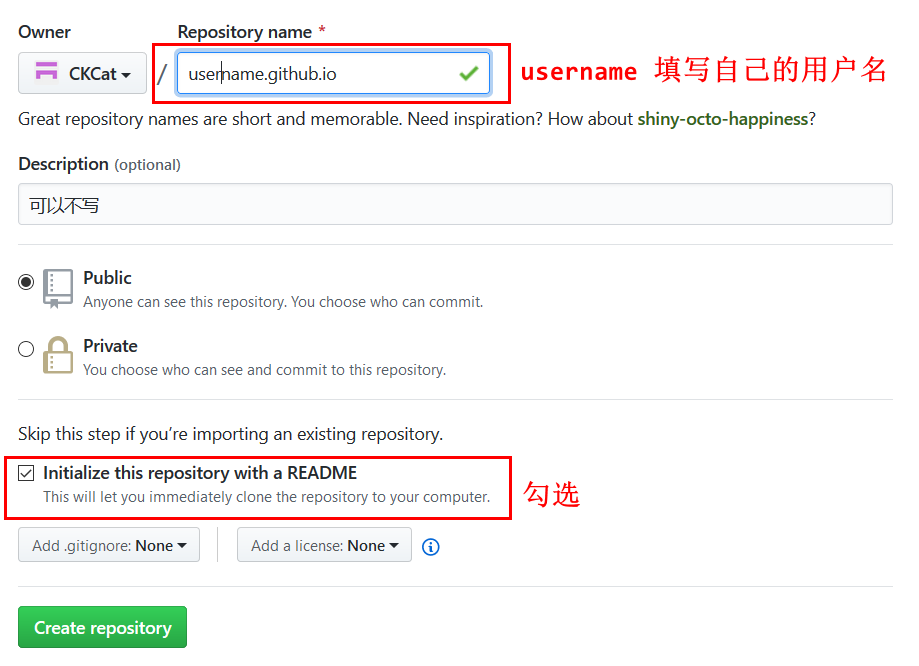
创建一个新的 github 仓库,仓库名为username.github.io,其他选项可以默认。

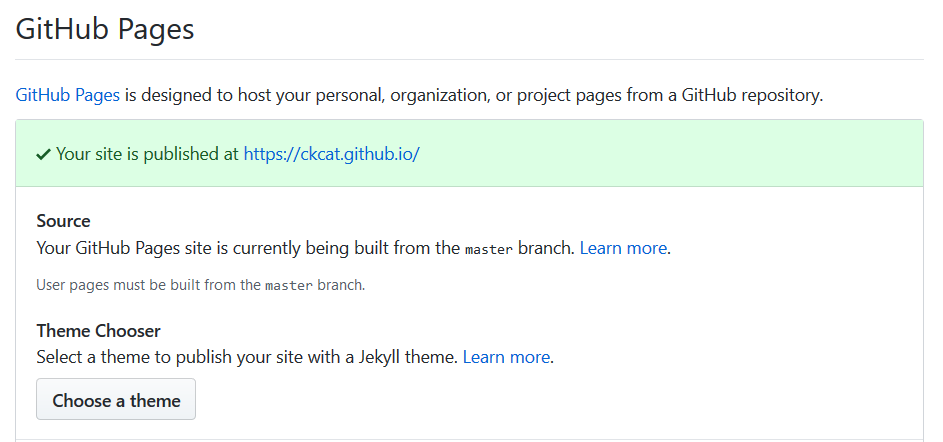
创建按仓库成功后,进入设置页面 GitHub Pages 选项,出现如下界面则表示博客页面创建成功。

三、安装 Hexo
1 | $ npm install hexo-cli -g |
1. 初始化
1 | $ hexo init blog |
2. 新建文章
1 | $ hexo new "Hello-Hexo" |
会在根目录下 source/_posts/ 生成 Hello-Hexo.md 文件,使用 markdown 编辑器非常方便。
3. 开启服务
1 | $ hexo server |
会看到提示INFO Hexo is running at http://0.0.0.0:4000/. Press Ctrl+C to stop. 代表博客已经正常运行,在浏览器打开http://0.0.0.0:4000/ 即可预览博客的初始状态。
了解更多 Hexo 的信息和其他步骤请参考官网的这篇文档 。
四、配置 Hexo 与 Github pages 进行关联
1. 配置关联
进入Blog目录,然后以文本编辑器打开 _config.yml 文件,修改 deploy 配置如下,rego 为 CKCat.github.io.git 仓库提交代码的 git 地址。
1 | deploy: |
2. 发布
使用下面的命令进行发布:
1 | hexo clean # 清除缓存 |
更多的 hexo 命令操作请参考Hexo 官方文档即可。
五、更换 NexT 主题
1. 下载主题
在 Blog 目录运行下列命令:
1 | $ git clone https://github.com/iissnan/hexo-theme-next themes/next |
2. 设置主题
克隆完成以后打开站点配置 _config.yml,找到 theme 字段,值改为next。
运行hexo server --debug,访问http://0.0.0.0:4000/ 查看主题是否生效。
3. 配置主题
常用的配置可以直接按照主题的官方参考手册配置。
下面介绍一下常用配置:
1. 标签云页面
新建一个页面,命名为 tags。命令如下:
1
$ hexo new page "tags"
编辑刚新建的页面,将页面的类型设置为 tags,主题将自动为这个页面显示标签云。页面内容如下:
1
2
3
4
5
6---
title: 标签
date: 2019-11-01 11:46:23
type: "tags"
---注意:如果有启用多说 或者 Disqus 评论,默认页面也会带有评论。需要关闭的话,请添加字段 comments 并将值设置为 false,如:
1
2
3
4
5title: 标签
date: 2019-11-01 11:46:23
type: "tags"
comments: false
---在菜单中添加链接。编辑 主题配置文件 ,添加 tags 到 menu 中,如下:
1
2
3
4menu:
home: /
archives: /archives
tags: /tags
2. 分类页面
新建一个页面,命名为 categories。命令如下:
1
$ hexo new page categories
编辑刚新建的页面,将页面的类型设置为 categories,主题将自动为这个页面显示所有分类。
1
2
3
4
5---
title: 分类
date: 2019-11-01 12:03:27
type: "categories"
---注意:如果有启用多说 或者 Disqus 评论,默认页面也会带有评论。需要关闭的话,请添加字段 comments 并将值设置为 false,如:
1
2
3
4
5
6
---
title: 分类
date: 2019-11-01 12:03:27
type: "categories"
comments: false
---在菜单中添加链接。编辑 主题配置文件 ,将 menu 中的 categories: /categories 注释去掉,如下:
1
2
3
4
5menu:
home: /
categories: /categories
archives: /archives
tags: /tags
3. About 页面
新建一个 about 页面:
1
$ hexo new page "about"
菜单显示 about 链接,在 主题配置文件 设置中将 menu 中 about
前面的注释去掉即可。menu: home: / archives: /archives tags: /tags about: /about友情链接编辑 站点配置文件 添加:
1
2
3
4
5# title, chinese available
links_title: Links
# links
links:
MacTalk: http://macshuo.com/
4. 腾讯公益 404 页面
简体中文增加腾讯公益 404 页面,寻找丢失儿童,让大家一起关注此项公益事业!效果如下 http://www.ixirong.com/404.html
使用方法,新建 404.md 页面,放到主题的 source 目录下,内容如下:
1 |
5. 代码高亮主题
NexT 使用 Tomorrow Theme0 作为代码高亮,共有 5 款主题供你选择。
默认使用的是白色的 normal。
6. 站点建立时间
这个时间将在站点的底部显示,例如© 2013 - 2019编辑 站点配置文件,新增字段 since。
1 | since: 2013 |
7. 数学公式显示
NexT 借助于 MathJax 来显示数学公式,此选项默认关闭。
编辑 主题配置文件,将 mathjax 设定为 true 即可。
1 | # MathJax Support |
ProTip: 使用七牛 CDN 来加速 MathJax 脚本的加载
8. 侧边栏社交链接
编辑 站点配置文件 ,新增字段 social,然后添加社交站点名称与地址即可。例如:
1 | #Social linkssocial: |
六、问题
1.hexo 引用本地图片无法显示
插件安装与配置
https://github.com/cocowool/hexo-image-link
首先我们需要安装一个图片路径转换的插件,这个插件名字是 hexo-image-link
1 | npm install hexo-image-link --save |
修改 _config.next.yml 配置文件
1 | hexo-asset-folder: true |
hexo 升级
由于最近安装了 NodeJS 14 导致无法使用旧版的 hexo,所以进行了一次升级,记录一下。
升级
Hexo 升级需要使用 npm-check、npm-upgrade、npm-update 按以下顺序逐步执行完成后,Hexo 版本及系统插件均会升级到最新。
1 | //以下指令均在Hexo目录下操作,先定位到Hexo目录 |
调整配置
升级后别急着 hexo g,需要先调整站点配置文件 hexo/_config.yml,否则会报错。
以下是废弃的字段,需要重新配置
1 | # Deprecated |
其他字段可以看官方文档,我这里不关心就不设置了。
NexT-8.x 跨版本升级
升级完 hexo 为 5.4 以后, next 主题也需要进行升级。
通过 npm 方式安装新版:
1 | //定位到hexo目录,npm安装主题 |
将 Next 主题配置文件 node_modules/hexo-theme-next/_config.yml 改名为 _config.next.yml, 复制到根目录(与 Hexo 站点配置文件_config.yml 在同一目录),这个文件的作用等同于旧版 next.yml,但优先级最高。这样做的好处是以后可以通过 npm 顺滑升级 Next 版本,不用担心配置文件被覆盖。相关字段的解释可以通过官方文档查看,我这里主要说一下摘要设置和统计人数设置。
设置摘要
官方给的方法:
- 使用
<!-- more -->插入你想设置摘要的文本位置之后,这个方法也是官方推荐的。 - 在文件头设置
description字段,内容即为摘要。
这两种方法都比较麻烦,我这里使用了第三方插件设置摘要。直接安装插件:
1 | npm install hexo-excerpt --save |
在 Hexo 站点配置文件_config.yml 添加下列字段
1 | excerpt: |
统计人数设置
统计人数可以直接通过设置 _config.next.yml 配置文件,将 enable 对应的值改为 true 即可。
1 | # Show Views / Visitors of the website / page with busuanzi. |
添加搜索插件
安装 hexo-generator-searchdb
1 | npm install hexo-generator-searchdb |
在 _config.yml 添加下面内容。
1 | search: |
_config.next.yml 添加下列内容:
1 | # Local search |
参考:https://theme-next.js.org/docs/third-party-services/search-services.html
添加 hexo-filter-markdown-plantuml 插件
1 | npm install hexo-filter-markdown-plantuml --save |
后续就可以 puml 或 plantuml 标记的代码生成对应的图片。
利用 github action 自动部署
参考:https://hexo.io/zh-cn/docs/github-pages
最关键的一点是需要修改一下 .github/workflows/pages.yml 中的 GITHUB_TOKEN,使用自己添加的 TOKEN ,否则有随机出错的可能。
1 | name: Pages |
前往 https://github.com/settings/tokens/new 申请一个 token,然后添加到项目的 前往 Settings > secrets > actions 添加一个变量 ACCESS_TOKEN ,然后将上面的 secrets.GITHUB_TOKEN 替换为 secrets.ACCESS_TOKEN 即可。