Frida 源码地址:https://github.com/frida/frida
Frida 官网:https://frida.re/
环境配置 安装 Frida 在安装 Frida 之前最好创建一个 python 虚拟环境,这样可以避免与其他环境产生干扰
1 $ conda create -n frida_12.8.7 python=3.9
荐使用 miniconda 创建虚拟环境,接下来就可以安装 Frida 了。
安装最新版 Frida
进入虚拟环境,直接运行下来命令即可安装完成
1
2
3
$ conda activate frida_12.8.7 $ pip install frida-tools $ pip install frida
安装完成后,运行 frida --version 查看 frida 的版本
安装特定版本的 Frida
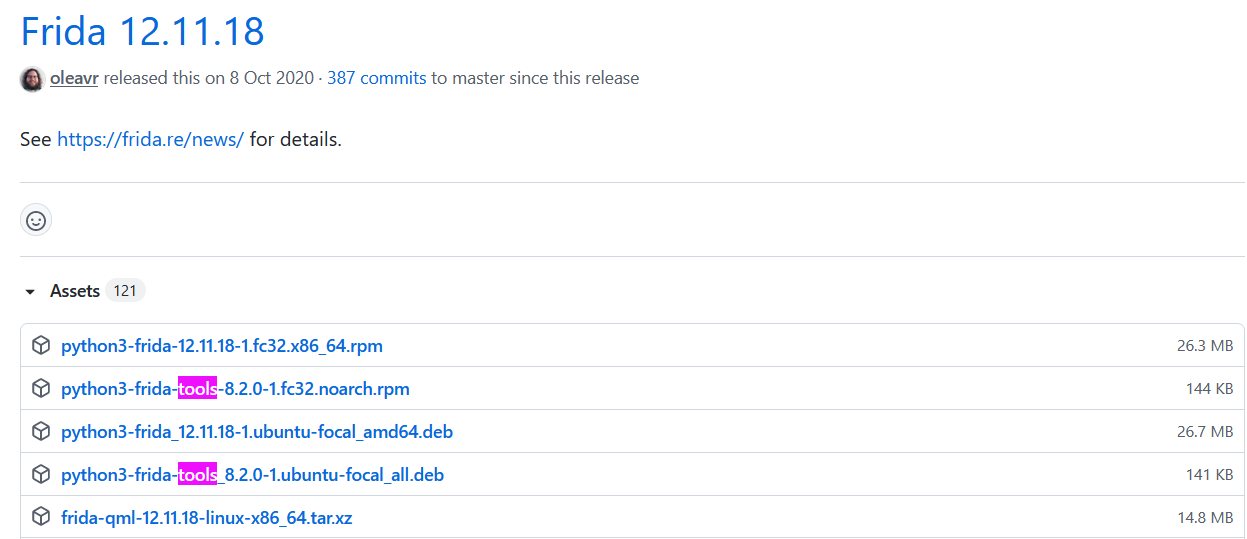
通过 Frida Releases 页面找到需要安装的 frida-tools 版本,使用 pip 指定版本安装,这里以 Frida 12.11.18 为例。
首先找到 frida-tools 版本。
然后使用 pip 安装对应的版本,下面为完整安装命令。
1
2
$ pip install frida==12.11.18 $ pip install frida-tools==8.2.0
安装完成后,根据 Frida 的版本去下载 对应的 frida-server。
最后将 frida-server push 进 data/local/tmp 目录,并给予其运行权限,使用 root 用户启动。
1
2
3
4
5
$ adb push frida-server data/local/tmp/ $ adb shell sailfish:/ $ su sailfish:/ sailfish:/
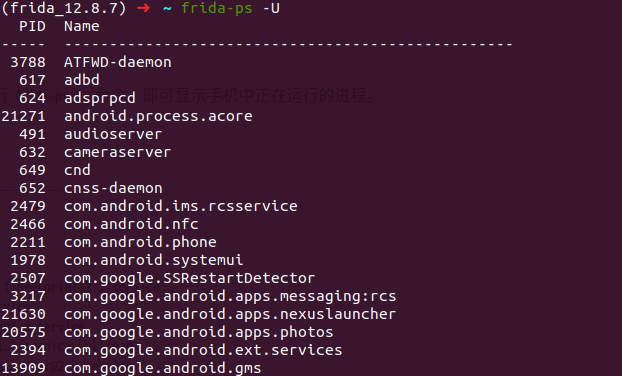
执行 frida-ps -U ,出现以下信息则表明安装成功。
如果遇到分析的样本有反调试,可以试试下面的 frida-server 版本:
https://github.com/Ylarod/Florida/releases
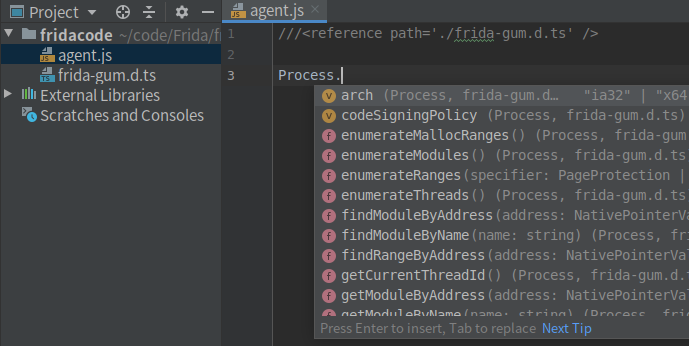
配置开发环境 为了在开发 Frida 脚本时有代码补全提示,我们可以使用下面两种方式进行环境配置。
使用 TypeScript(推荐)
使用 Frida 官方提供的开发环境 frida-agent-example ,该环境需要使用 TypeScript 开发。
构建开发环境
1
2
3
$ git clone https://github.com/oleavr/frida-agent-example.git $ cd frida-agent-example/ $ npm install
启用实时编译
1
2
3
$ npm run watch $ frida-compile agent/index.ts -o _agent.js -w
后续直接使用 index.ts 开发即可实现代码补全提示。
引用 frida-gum.d.ts
在 Frida 源码中获取 frida-gum.d.ts 文件,该文件包含了所有的 API 。
在我们开发的 js 脚本首行中引用 frida-gum.d.ts 文件,即可实现代码补全提示。
1 `///<reference path='./frida-gum.d.ts'/>` ;
其他方式获取 frida-gum.d.ts 文件:
https://www.npmjs.com/package/@types/frida-gum
配置调试环境 这里主要使用 chrome 和 pycharm 两种方式进行调试。
首先使用 Frida 命令或者 python 脚本以调试模式加载 js 脚本。
Frida 命令:
1 $ frida -U com.example.android -l _agent.js --debug --runtime=v8 <port/name>
python 脚本:
1
2
3
session = dev.attach(app.pid) script = session.create_script(jscode, runtime="v8" ) session.enable_debugger()
启动后会回显 Inspector 正在监听 9229 默认端口,下面就可以使用 chome 或 pycharm 进行调试了。
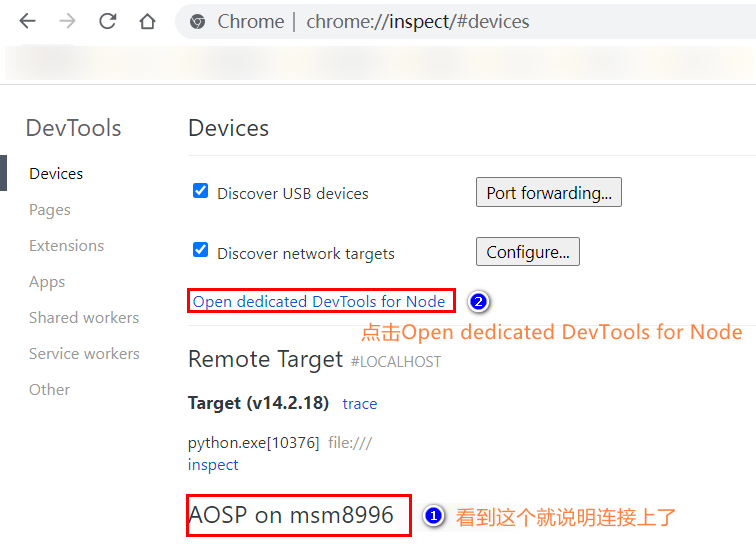
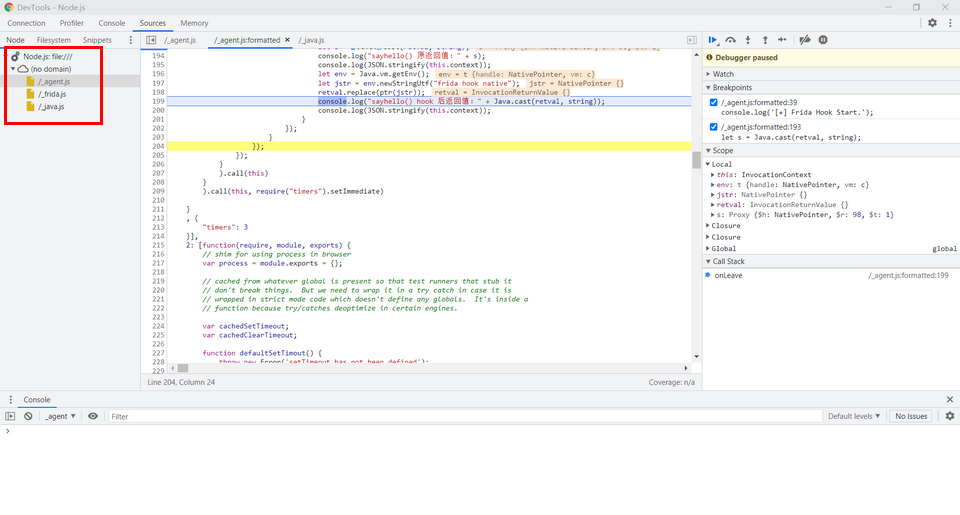
chome 调试 chrome://inspect 页面, 点击 Open dedicated DevTools for Node 。
此时 debug 已经连接,切换至 Sources ,按 Command + P 加载要调试的脚本,即可下断调试了。
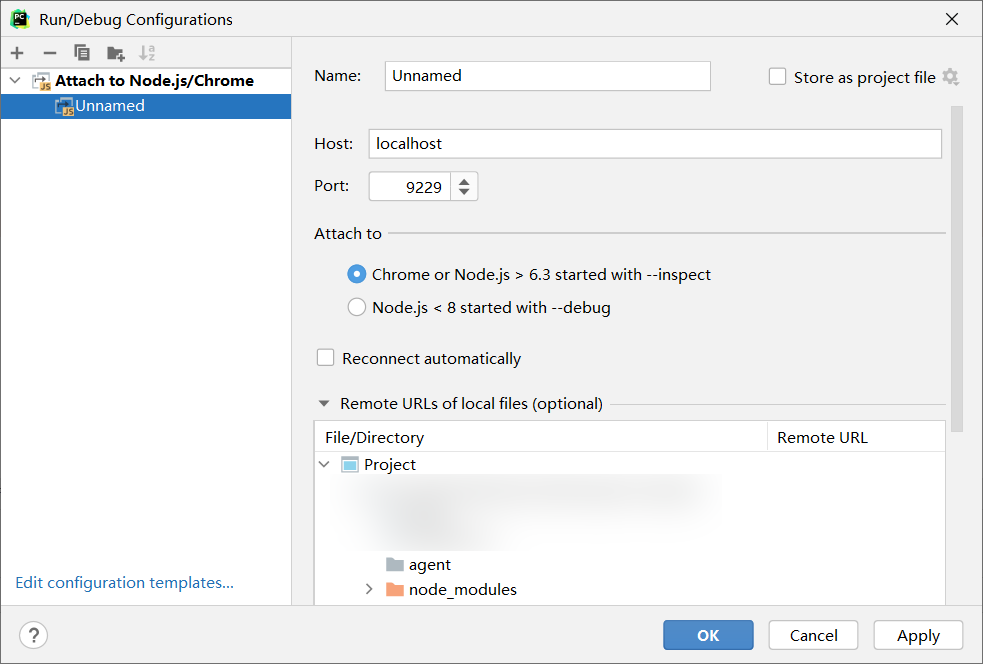
pycharm 调试 Node.js 插件,重启。然后添加调试器 Attaching to Node.js/Chrome,端口默认即可。
我这里使用的 node 版本为 12.21.0 。
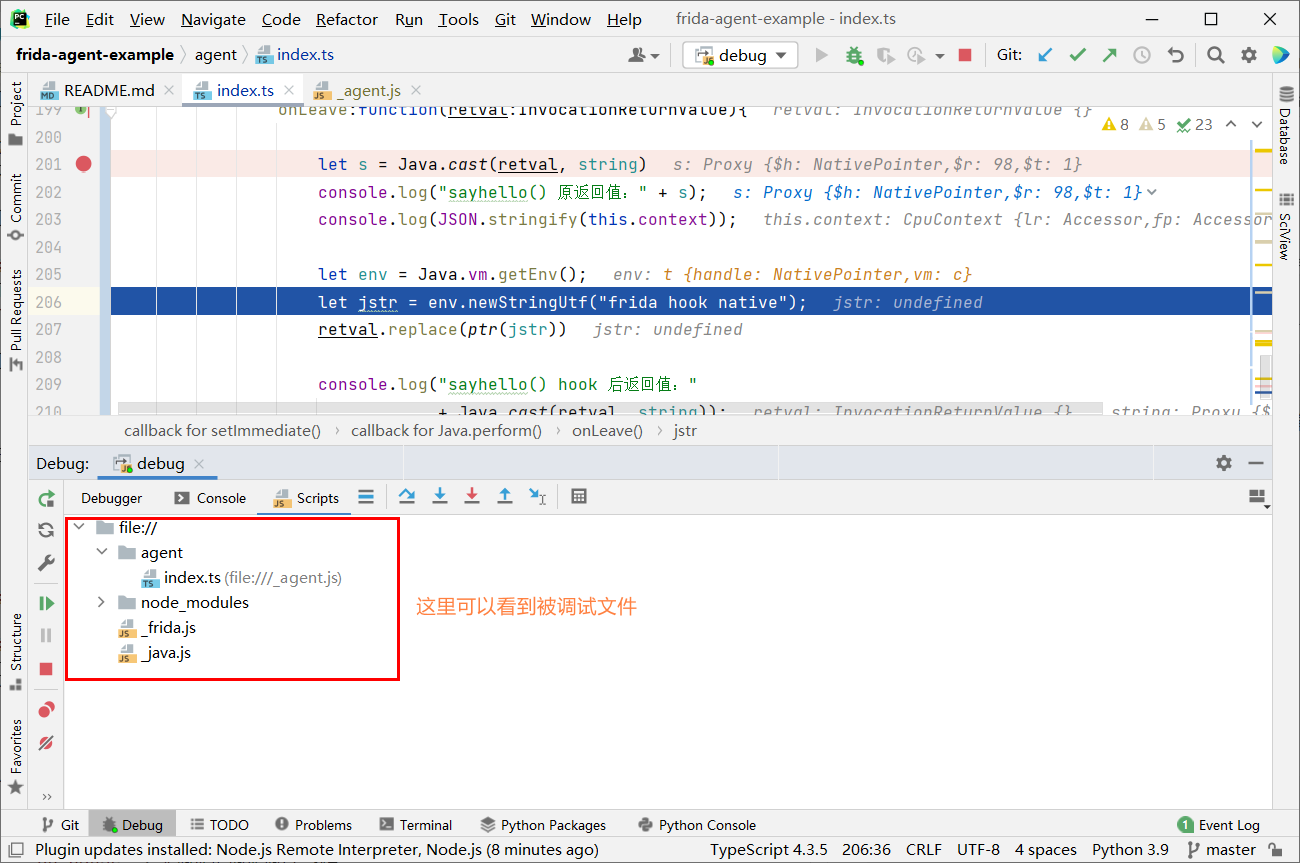
在 ts 文件中设置好断点,执行 pycharm 调试功能即可。
如果调试 js 脚本, 触发断点需要在 debug 窗口切换到 script 选项卡,右键要调试的脚本,选择 Open Actual Source,在新打开的 Actual Source 窗口设置好断点后,需要再取消/启用一次所有断点作为激活,发现断点上打上对勾才真正可用了。(未测试)
参考:https://bbs.pediy.com/thread-265160-1.htm
Frida 使用 执行 Frida 脚本 通过运行 frida -h 可以查看 frida 支持的命令,其中可以使用 attach 和 spawn 两种方式执行 frida 脚本。
1
2
3
4
5
6
7
8
9
10
11
12
13
14
15
16
17
18
19
20
21
22
23
24
25
26
27
28
29
30
31
32
33
34
35
36
37
38
39
40
41
42
43
44
45
46
47
48
49
50
51
52
53
54
55
56
57
58
59
60
61
62
63
64
65
66
67
68
69
70
71
72
73
74
75
$ frida -h usage: frida [options] target positional arguments: args extra arguments and/or target optional arguments: -h, --help show this help message and exit -D ID, --device ID connect to device with the given ID -U, --usb connect to USB device -R, --remote connect to remote frida-server -H HOST, --host HOST connect to remote frida-server on HOST --certificate CERTIFICATE speak TLS with HOST, expecting CERTIFICATE --origin ORIGIN connect to remote server with “Origin” header set to ORIGIN --token TOKEN authenticate with HOST using TOKEN --keepalive-interval INTERVAL set keepalive interval in seconds, or 0 to disable (defaults to -1 to auto-select based on transport) --p2p establish a peer-to-peer connection with target --stun-server ADDRESS set STUN server ADDRESS to use with --p2p --relay address,username,password,turn-{udp,tcp,tls} add relay to use with --p2p -f TARGET, --file TARGET spawn FILE -F, --attach-frontmost attach to frontmost application -n NAME, --attach-name NAME attach to NAME -N IDENTIFIER, --attach-identifier IDENTIFIER attach to IDENTIFIER -p PID, --attach-pid PID attach to PID -W PATTERN, --await PATTERN await spawn matching PATTERN --stdio {inherit,pipe} stdio behavior when spawning (defaults to “inherit”) --aux option set aux option when spawning, such as “uid=(int)42” (supported types are: string, bool, int) --realm {native,emulated} realm to attach in --runtime {qjs,v8} script runtime to use --debug enable the Node.js compatible script debugger --squelch-crash if enabled, will not dump crash report to console -O FILE, --options-file FILE text file containing additional command line options --version show program's version number and exit -l SCRIPT, --load SCRIPT load SCRIPT -P PARAMETERS_JSON, --parameters PARAMETERS_JSON parameters as JSON, same as Gadget -C USER_CMODULE, --cmodule USER_CMODULE load CMODULE --toolchain {any,internal,external} CModule toolchain to use when compiling from source code -c CODESHARE_URI, --codeshare CODESHARE_URI load CODESHARE_URI -e CODE, --eval CODE evaluate CODE -q quiet mode (no prompt) and quit after -l and -e -t TIMEOUT, --timeout TIMEOUT seconds to wait before terminating in quiet mode --pause leave main thread paused after spawning program -o LOGFILE, --output LOGFILE output to log file --eternalize eternalize the script before exit --exit-on-error exit with code 1 after encountering any exception in the SCRIPT --kill-on-exit kill the spawned program when Frida exits --auto-perform wrap entered code with Java.perform --auto-reload Enable auto reload of provided scripts and c module (on by default, will be required in the future) --no-auto-reload Disable auto reload of provided scripts and c module
attach 方式
attach 到已经存在的进程,核心原理是 ptrace 修改进程内存,如果进程处于调试状态( traceid 不等于 0 ),则 attach 失败。启动命令如下:
1 $ frida -UN com.example.android -l _agent.js
以上命令对应的 python 脚本如下:
1
2
3
4
5
6
7
8
9
10
11
12
13
14
15
16
17
import sysimport timeimport fridadef on_message (message,data ): print ("message" ,message) print ("data" ,data) device = frida.get_usb_device() session = device.attach("com.example.android" ) with open ("_agent.js" ,"r" , encoding = "utf8" ) as f: script = session.create_script(f.read()) script.on("message" ,on_message) script.load() sys.stdin.read()
spawn 方式
启动一个新的进程并挂起,在启动的同时注入 frida 代码,适用于在进程启动前的一些 hook ,如 hook RegisterNative 等,注入完成后调用 resume 恢复进程。启动命令如下:
1 frida -U -f com.example.android -l _agent.js
对应的 python 脚本如下:
1
2
3
4
5
6
7
8
9
10
11
12
13
14
15
16
17
18
19
20
import sysimport timeimport fridadef on_message (message,data ): print ("message" ,message) print ("data" ,data) device = frida.get_usb_device() pid = device.spawn(["com.example.android" ]) device.resume(pid) session = device.attach(pid) with open ("_agent.js" ,'r' , encoding = "utf8" ) as f: script = session.create_script(f.read()) script.on("message" ,on_message) script.load() sys.stdin.read()
Frida 自定义端口 默认情况下启动 frida-server 将会开启 27042 端口,如下所示:
1
2
3
4
sailfish:/ tcp 0 0 127.0.0.1:27042 0.0.0.0:* LISTEN 5038/frida-server-14.2.18-android-arm64 tcp 0 0 127.0.0.1:27042 127.0.0.1:46075 ESTABLISHED 5038/frida-server-14.2.18-android-arm64 tcp6 0 0 :::49039 :::* LISTEN 5038/frida-server-14.2.18-android-arm64
如果该端口被占用,启动 frida-server 将会失败,我们可以使用 -l 参数自定义端口,如下所示:
对应的 Frida 启动方式也需要作相应的改变,如下所示:
1
2
3
$ adb forward tcp:6666 tcp:6666 6666 $ frida -H 127.0.0.1:6666 com.example.android -l _agent.js
对应的 python 脚本如下:
1 2 3 4 5 6 7 8 9 10 11 12 13 14 15 16 17 18 19 import frida, sysjsCode = """ console.log("test"); """ def message (message, data ): if message['type' ] == 'send' : print (f"[*] {message['payload' ]} " ) else : print (message) process = frida.get_device_manager().add_remote_device('127.0.0.1:6666' ).attach('com.example.android' ) script = process.create_script(jsCode) script.on("message" ,message) script.load() input ()
如果使用无线 adb 连接,则需要改变对应的 IP 为 WADB 显示的 IP 即可。
Frida Hook Java 常用方法 该方法相当于 C 语言的 main() 函数,Java 层的 Hook 都是从 Java.perform 开始的。具体用法如下:
1
2
3
Java .perform (function ( });
Java.choose 用于查找堆中指定类的实例。获得实例后可以调用实例的函数。具体用法如下:
1
2
3
4
5
6
7
8
Java .choose ("com.example.android.Dog" , { onMatch : function ( }, onComplete : function ( }, });
例如:
1
2
3
4
5
6
7
8
9
10
11
12
13
14
15
16
function main ( Java .perform (function ( console .log ("Frida Hook Start." ); Java .choose ("com.example.android.Dog" , { onMatch : function (instance ) { console .log (`Hook 对象 ${JSON .stringify(instance)} ` ); console .log (`Hook 对象 name: ${JSON .stringify(instance.name.value)} ` ); }, onComplete : function ( console .log ("Hook 对象 onComplete" ); }, }); }); } setImmediate (main);
Java.available 确认当前进程的 java 虚拟机是否已经启动,虚拟机包括 Dalbik 或者 ART 等。虚拟机没有启动的情况下不要唤醒其他 java 的属性或者方法。返回值是一个 boolean 。
Java.enumerateLoadedClasses 列出当前已经加载的类,用回调函数处理。声明为:Java.enumerateLoadedClasses(callbacks) 。用法如下:
1
2
3
4
5
6
7
8
9
Java .enumerateLoadedClasses ({ onMacth : function (className ) { }, onComplete : function ( }, });
Java.enumerateClassLoaders 主要用于列出 Java JVM 中存在的类加载器。声明为:Java.enumerateClassLoaders(callbacks) 。用法如下:
1
2
3
4
5
6
7
8
9
Java .enumerateClassLoaders ({ onMatch : function (loader ) { }, onComplete : function ( }, });
Java.registerClass 用于注册一个类到内存,这个类可以是我们自己定义的,也就是说我们可以通过这个方式来自定义类加入到内存中,也可以是已经存在的类。声明为:Java.registerClass(callbacks) 。用法如下:
1
2
3
4
5
6
7
let obj = Java .registerClass ({ name : "com.example.android.Dog" , superClass : "xxx" , implements : "xxx" , fields : { 属性名: "类型" }, methods : {}, });
例子:
1 2 3 4 5 6 7 8 9 10 11 12 13 14 15 16 17 18 19 20 21 22 23 24 25 26 27 28 29 30 31 32 33 34 35 36 37 38 39 40 41 42 43 44 45 46 47 48 49 50 51 52 53 54 55 56 57 58 59 60 61 62 63 64 let SomeBaseClass = Java .use ("com.example.SomeBaseClass" );let X509TrustManager = Java .use ("javax.net.ssl.X509TrustManager" );let MyWeirdTrustManager = Java .registerClass ({ name : "com.example.MyWeirdTrustManager" , superClass : SomeBaseClass , implements : [X509TrustManager], fields : { description : "java.lang.String" , limit : "int" , }, methods : { $init : function ( console .log ("Constructor called" ); }, checkClientTrusted : function (chain, authType ) { console .log ("checkClientTrusted" ); }, checkServerTrusted : [ { returnType : "void" , argumentTypes : [ "[Ljava.security.cert.X509Certificate;" , "java.lang.String" , ], implementation : function (chain, authType ) { console .log ("checkServerTrusted A" ); }, }, { returnType : "java.util.List" , argumentTypes : [ "[Ljava.security.cert.X509Certificate;" , "java.lang.String" , "java.lang.String" , ], implementation : function (chain, authType, host ) { console .log ("checkServerTrusted B" ); return null ; }, }, ], getAcceptedIssuers : function ( console .log ("getAcceptedIssuers" ); return []; }, }, });
Java.use 在 Frida 中通过 Java.use(className) 来加载类,相当于 Java 的 Class.forName() 。用法如下:
1 2 let jString = Java .use ("java.lang.String" );
加载类后,可以使用 $new() 来创建一个对象,例如创建一个 String 对象。
1
2
let jStringClass = Java .use ("java.lang.String" );let jString = jStringClass.$new("字符串" );
Java.array 通过 Java.array() 可以在 Frida 中创建任意类型的数组。用法如下:
1 Java .array ("type" , [value1, value2, value3]);
例子:
1 2 3 4 5 6 7 8 9 10 11 12 13 14 15 16 17 18 19 20 21 22 23 24 function main ( Java .perform (function ( let myCharArr = Java .array ("char" , ["H" , "e" , "l" , "l" , "o" ]); let myStringArr = Java .array ("Ljava.lang.String;" , [ "W" , "o" , "r" , "l" , "d" , ]); let ArrayClass = Java .use ("java.util.Arrays" ); console .log (ArrayClass .toString (myCharArr)); console .log (ArrayClass .toString (myStringArr)); let charArr = ["你" , "好" , "!" ]; let strArr = ["你" , "好" , "!" ]; console .log (ArrayClass .toString (charArr)); console .log (ArrayClass .toString (strArr)); }); } setImmediate (main);
Java.cast 在 Frida 中使用 Java.cast() 来强转类型。例如我想获取某个对象的 Class ,那么就可以如下写:
1
2
let clazz = Java .use ("java.lang.Class" );let cls = Java .cast (obj.getClass (), clazz);
Frida 中数据类型定义 基本数据类型:
Frida 中的基本类型全名
Frida 中的基本类型缩写(定义数组时使用)
boolean
Z
byte
B
char
C
double
D
float
F
int
I
long
J
short
S
数组类型
在 Frida 中用 [ 表示数组,和 java 中的的表示方法一致。
例如是 int 类型的数组,写法为:[I ,如果是 String 类型的数组,则写法为:[java.lang.String; 。
反射调用 反射调用效率比较低,一般情况下不要使用。
获取方法及使用。
1
2
3
4
5
6
7
8
9
10
11
12
13
14
15
16
17
18
19
20
21
22
23
24
25
26
27
28
29
let clazz = Java .use (className);let Constructor = jString.class .getConstructor ([Type .class , Type .class ...]);Constructor .setAccessible (true )let obj = Constructor .newInstance ([Type .obj , Type .obj ...]);let methods = jString.class .getMethods ();let methods = jString.class .getDeclaredMethods ();let method = jString.class .getMethod ("methodName" , [Type .class , Type .class ...])method.setAccessible (true ); method.invoke (obj, [Type .obj , Type .obj ...]); let method = jString.class .getDeclaredMethod ("methodName" , [Type .class , Type .class ...])method.setAccessible (true ); method.invoke (obj, [Type .obj , Type .obj ...]);
获取属性值和设置属性值。
1
2
3
4
5
6
7
8
9
10
11
12
13
14
15
16
17
18
19
let jString = Java .use (className);let fields = jString.class .getFields ();let fields = jString.class .getDeclaredFields ();let field = jString.class .getField (fieldName);field.setAccessible (true ); let field = nameField.get (obj);field.set (user, value); let field = jString.class .getDeclaredField (fieldName);field.setAccessible (true ); let field = nameField.get (obj);field.set (user, value);
例子:
1
2
3
4
5
6
7
8
9
10
11
12
13
14
15
16
17
18
19
20
21
22
23
24
25
26
27
28
29
30
31
32
33
34
35
36
37
38
39
40
41
42
43
44
45
46
47
48
49
50
51
52
function main ( Java .perform (function ( console .log ("Frida Hook Start." ); let Dog = Java .use ("com.example.android.Dog" ); let Methods = Dog .class .getDeclaredMethods (); console .log ("--------------------------------------------" ); for (let method of Methods ) console .log ("Dog DeclaredMethods: " + JSON .stringify (method.toString ())); console .log ("--------------------------------------------" ); let String = Java .use ("java.lang.String" ); let Integer = Java .use ("java.lang.Integer" ); let int = Integer .class .getField ("TYPE" ).get (null ); let Constructor = Dog .class .getConstructor ([String .class , int]); console .log (JSON .stringify (Constructor )); let dog = Constructor .newInstance ([String .$new("小白" ), Integer .$new(2 )]); let sleep = Dog .class .getDeclaredMethod ("sleep" , null ); sleep.setAccessible (true ); sleep.invoke (dog, null ); let _sleep = Dog .class .getDeclaredMethod ("sleep" , [String .class ]); _sleep.invoke (dog, [String .$new("狗窝" )]); console .log ("============================================" ); let fields = Dog .class .getDeclaredFields (); for (let field of fields) { console .log ("Filed: " + JSON .stringify (field.toString ())); } console .log ("============================================" ); let reflect_TAG = Dog .class .getDeclaredField ("TAG" ); reflect_TAG.setAccessible (true ); console .log ("TAG: " + reflect_TAG.get (null )); reflect_TAG.set (null , "HOOK OK" ); console .log ("TAG: " + reflect_TAG.get (null )); let reflect_name = Dog .class .getField ("name" ); reflect_name.setAccessible (true ); let Animal = Java .use ("com.example.android.Animal" ); console .log ("name: " + reflect_name.get (dog)); reflect_name.set (dog, "小黑" ); console .log ("name: " + reflect_name.get (dog)); }); } setImmediate (main);
实例化对象 1 2 3 4 5 6 7 8 9 10 11 12 13 function main ( Java .perform (function ( console .log ("Frida Hook Start." ); let Dog = Java .use ("com.example.android.Dog" ); let dog = Dog .$new("小白" , 2 ); console .log ("实例化对象" + JSON .stringify (dog)); dog.eat ("狗粮" ); dog.sleep (); dog.sleep ("狗窝" ); }); } setImmediate (main);
Hook 操作 hook 普通方法 直接使用 类.方法名.implementation =function(){} 来对一个方法进行 Hook 。
1 2 3 4 5 6 7 8 9 10 11 12 13 14 15 16 17 function main ( Java .perform (function ( console .log ("Frida Hook Start." ); let MainActivity = Java .use ("com.example.android.MainActivity" ); MainActivity .add .implementation = function (a: number, b: number ) { console .log (`add params a: ${a} , b: ${b} ` ); console .log ( `add params arguments[0]: ${arguments [0 ]} , arguments[1]: ${arguments [1 ]} ` ); return a * 2 + b * 2 ; }; }); } setImmediate (main);
Hook 重载方法 使用 类.方法名.overload(参数).implementation =function(){} 进行 Hook ,其中参数为重载的类型。
1 2 3 4 5 6 7 8 9 10 11 12 13 14 15 16 function main ( Java .perform (function ( console .log ("Frida Hook Start." ); let Dog = Java .use ("com.example.android.Dog" ); Dog .sleep .overload ().implementation = function ( console .log ("hook 重载方法 sleep ." ); }; Dog .sleep .overload ("java.lang.String" ).implementation = function ( str: string ) { console .log ("hook 重载方法 sleep(String) " + str); }; }); } setImmediate (main);
Hook 构造方法 如果没有重载,直接使用 类.$init.implementation =function(){} 进行 Hook 。
如果存在重载,则使用 类.$init.overload(参数).implementation =function(){} 进行 Hook 。
1 2 3 4 5 6 7 8 9 10 11 12 13 14 15 16 17 18 19 20 21 function main ( Java .perform (function ( console .log ("Frida Hook Start." ); let Dog = Java .use ("com.example.android.Dog" ); Dog .$init .implementation = function (name: string, age: number ) { console .log ( "hook Dog 构造函数,原始参数为 name : " + name + "; age: " + age ); this .$init("土狗" , 10 ); console .log ( "hook Dog 构造函数,修改参数为 name : " + this .name .value + "; age: " + this .age .value ); }; }); } setImmediate (main);
Hook 成员变量 1 2 3 4 5 6 7 8 9 10 11 12 13 14 15 16 17 18 19 20 21 22 23 24 25 function main ( Java .perform (function ( console .log ("Frida Hook Start." ); let MainActivity = Java .use ("com.example.android.MainActivity" ); let TAG = MainActivity .TAG ; console .log ("static value TAG:" + TAG .value ); TAG .value = "HOOK OK" ; MainActivity .onCreate .overload ("android.os.Bundle" ).implementation = function (bundle: Object ) { let add = this ._add ; console .log ("add value : " + add.value ); console .log ("static value TAG:" + TAG .value ); this .onCreate (bundle); add.value = 11 ; }; }); } setImmediate (main);
Hook 内部类 1 2 3 4 5 6 7 8 9 10 11 12 13 14 function main ( Java .perform (function ( console .log ("Frida Hook Start." ); let innerClass = Java .use ("com.example.android.MainActivity$innerClass" ); innerClass.setNum .implementation = function (num: number ) { console .log ("innerClass setNum num value: " + num); this .setNum (1 ); }; }); } setImmediate (main);
Hook 匿名类 1 2 3 4 5 6 7 8 9 10 11 12 13 14 15 16 17 18 19 20 function main ( Java .perform (function ( console .log ("Frida Hook Start." ); let cat = Java .use ("com.example.android.MainActivity$1$1" ); cat.eat .implementation = function (food: string ) { console .log (this .getName () + " eat " + food); this .eat ("鱼" ); }; let callback = Java .use ("com.example.android.MainActivity$1$2" ); callback.finsh .implementation = function (msg: string ) { console .log ("callback finsh: " + msg); this .finsh ("hello world!" ); }; }); } setImmediate (main);
Hook 参数为数组的方法 1 2 3 4 5 6 7 8 9 10 11 12 13 14 15 16 17 18 19 20 21 22 23 function main ( Java .perform (function ( console .log ("Frida Hook Start." ); let MainActivity = Java .use ("com.example.android.MainActivity" ); let innerClass = Java .use ("com.example.android.MainActivity$innerClass" ); MainActivity .printArray .overload ( "[Lcom.example.android.MainActivity$innerClass;" ).implementation = function (arr: any ) { for (let i of arr) { console .log (i.getNum ()); } let a = Java .array ("Lcom.example.android.MainActivity$innerClass;" , [ innerClass.$new(this , 111 ), innerClass.$new(this , 222 ), innerClass.$new(this , 333 ), ]); this .printArray (a); }; }); } setImmediate (main);
其他 打印调用栈 在逆向中我们可以通过打印调用栈获取关键方法的调用关系。相关代码如下所示:
1 2 3 4 5 6 7 8 9 10 11 12 13 14 15 16 17 18 19 20 function stackTraceHere ( return Java .use ("android.util.Log" ).getStackTraceString ( Java .use ("java.lang.Exception" ).$new() ); } function main ( Java .perform (function ( console .log ("Frida Hook Start." ); let MainActivity = Java .use ("com.example.android.MainActivity" ); MainActivity .add .implementation = function (a: number, b: number ) { let stack = stackTraceHere (); console .log (stack); return this .add (a, b); }; }); } setImmediate (main);
Hook 指定类的所有方法 1 2 3 4 5 6 7 8 9 10 11 12 13 14 15 16 17 18 19 20 21 22 23 24 25 26 27 28 29 30 31 32 function main ( Java .perform (function ( let classList = Java .enumerateLoadedClassesSync (); for (let className of classList) { if (className.indexOf ("com.example.android.Dog" ) != -1 ) { let declaredMethods = Java .use (className).class .getDeclaredMethods (); console .log ("---------------------------" ); for (let method of declaredMethods) { let methodName = method.getName (); let hookClass = Java .use (className); for (let overloads_md of hookClass[methodName].overloads ) { overloads_md.implementation = function ( for (let arg of arguments ) { console .log ( `${methodName} -> argType: [${typeof arg} ] ;argValue: [${arg} ] .` ); } return this [methodName].apply (this , arguments ); }; } } console .log ("============================" ); } } }); } setImmediate (main);
Hook 动态加载的 dex 1 2 3 4 5 6 7 8 9 10 11 12 13 14 15 16 17 18 19 20 21 22 23 24 25 26 27 28 29 30 function main ( Java .perform (function ( Java .enumerateClassLoaders ({ onMatch : function (loader ) { console .log ( `Java.classFactory.loader :${JSON .stringify( Java.classFactory.loader )} ` ); try { let className = "com.example.Dynamic.Fibonacci" ; if (loader.loadClass (className)) { Java .classFactory .loader = loader; let Fibonacci = Java .use (className); let ret = Fibonacci .fibonacci (20 ); console .log ("ret: " + ret); } } catch (e) { console .log (e); } }, onComplete : function ( console .log ("onComplete!!!" ); }, }); }); } setImmediate (main);
Hook 打印 non-ascii 和特殊字符 一些特殊字符和不可见字符, 可以先通过编码再解码的方式进行 hook 。
1 2 3 int ֏(int x) { return x + 100 ; }
针对上面的 ֏ , 直接用 js 编码, 在通过类名 [js解码的方法名] 进行 implementation 。
1 2 3 4 5 6 7 8 9 10 11 12 13 14 15 16 17 18 19 20 21 Java .perform (function x ( var targetClass = "com.example.hooktest.MainActivity" ; var hookCls = Java .use (targetClass); var methods = hookCls.class .getDeclaredMethods (); for (var i in methods) { console .log (methods[i].toString ()); console .log ( encodeURIComponent ( methods[i].toString ().replace (/^.*?\.([^\s\.\(\)]+)\(.*?$/ , "$1" ) ) ); } hookCls[decodeURIComponent ("%D6%8F" )].implementation = function (x ) { console .log ("original call: fun(" + x + ")" ); var result = this [decodeURIComponent ("%D6%8F" )](900 ); return result; }; });
write-ups-2015 首先我们根据 Frida 官网给的测试用例 简单的熟悉一下 Frida 的使用。
1 2 3 4 5 6 7 8 9 10 11 12 13 14 15 16 17 18 19 20 21 22 23 24 25 26 27 28 29 30 function main ( Java .perform (function ( let MainActivity = Java .use ( "com.example.seccon2015.rock_paper_scissors.MainActivity" ); MainActivity .onClick .implementation = function (v: any ) { this .onClick (v); this .m .value = 0 ; this .n .value = 1 ; this .cnt .value = 999 ; let flag = `SECCON{${(1000 + this .calc()) * 107 } }` ; console .log ("flag: " + flag); }; let TextView = Java .use ("android.widget.TextView" ); TextView .setText .overload ("java.lang.CharSequence" ).implementation = function (str: string ) { if (this .getId ().toString (16 ).toUpperCase () == "7F0C0052" ) { console .log ("setText : " + str); } this .setText (str); }; }); } setImmediate (main);
Frida Hook so 常用方法 Process.enumerateModules 用于查看目标 module 是否被正常加载, 使用 Process.enumerateModules() 将当前加载的所有 so 文件打印出来。
使用方法:
1 2 3 4 5 6 7 8 9 10 11 12 13 function main ( Java .perform (function ( let modules = Process .enumerateModules (); for (let module of modules) { if (module .name .indexOf ("libcalc.so" ) != -1 ) { console .log ( `module name: ${module .name} ; base: ${module .base} ; path:${module .path} ` ); } } }); } setImmediate (main);
Module.findBaseAddress 获取指定 so 文件的基地址。
使用方法:
1 2 3 4 5 6 7 function main ( Java .perform (function ( let baseAddr = Module .findBaseAddress ("libcalc.so" ); console .log ("libcalc.so baseAddr: " , baseAddr); }); } setImmediate (main);
Module.findExportByName 通过导出函数名获取对应的地址。
使用方法:
1 2 3 4 5 6 7 8 9 10 function main ( Java .perform (function ( let calc = Module .findExportByName ( "libcalc.so" , "Java_com_example_seccon2015_rock_1paper_1scissors_MainActivity_calc" ); console .log ("calc addr: " , calc); }); } setImmediate (main);
Frida 代码片段 Hook StringBuilder and print data only from a specific class
1 2 3 4 5 6 7 8 9 10 11 12 13 14 15 16 17 18 19 20 21 22 23 24 25 26 27 let sbActivate = false ;Java .perform (function ( const StringBuilder = Java .use ("java.lang.StringBuilder" ); StringBuilder .toString .implementation = function ( let res = this .toString (); if (sbActivate) { let tmp = "" ; if (res !== null ) { tmp = res.toString ().replace ("/n" , "" ); console .log (tmp); } } return res; }; }); Java .perform (function ( const someclass = Java .use ("<the specific class you are interested in>" ); someclass.someMethod .implementation = function ( sbActivate = true ; let res = this .someMethod (); sbActivate = false ; return res; }; });
byte[]这种 hook 输出的时候该怎么写呢?
1 2 3 4 5 6 7 8 9 10 11 12 let ByteString = Java .use ("com.android.okhttp.okio.ByteString" );let j = Java .use ("c.business.comm.j" );j.x .implementation = function ( let result = this .x (); console .log ("j.x:" , ByteString .of (result).hex ()); return result; }; j.a .overload ("[B" ).implementation = function (bArr ) { this .a (bArr); console .log ("j.a:" , ByteString .of (bArr).hex ()); };
hook Androd 7 以上的 dlopen 。
1 2 3 4 5 6 7 8 9 10 11 12 13 14 15 16 17 18 19 let android_dlopen_ext = Module .findExportByName (null , "android_dlopen_ext" );console .log (android_dlopen_ext);if (android_dlopen_ext != null ) { Interceptor .attach (android_dlopen_ext, { onEnter : function (args ) { let soName = args[0 ].readCString (); console .log (soName); if (soName.indexOf ("**.so" ) !== -1 ) { console .log ("------load **----------" ); this .hook = true ; } }, onLeave : function (retval ) { if (this .hook ) { } }, }); }
frida 如何注入 dex?
1 Java .openClassFile (dexPath).load ();
在系统里装上这个这个 npm 包,可以在任意工程获得 frida 的代码提示、补全和 API 查看。
1 npm i -g @types/frida-gum
参考:
1
2
https://kevinspider.github.io/fridahookjava/ https://zyzling.gitee.io/2020/05/12/Frida%E5%AD%A6%E4%B9%A0%E7%AC%94%E8%AE%B0/

