Xposed源码剖析——概述 XPosed 是与 Cydia 其名的工具,它能够让 Android 设备在没有修改源码的情况下修改系统中的 API 运行结果。我们通常称之为:God Mode(上帝模式)。
之前享大家分享了 Xposed 的基础,Xposed 的作用和最简单的用法。那么,它的原理和它的内部构造是如何构成的?下面,我们从 Github 上看看,rovo89 大神是如何制作的。
rovo89的github地址:https://github.com/rovo89
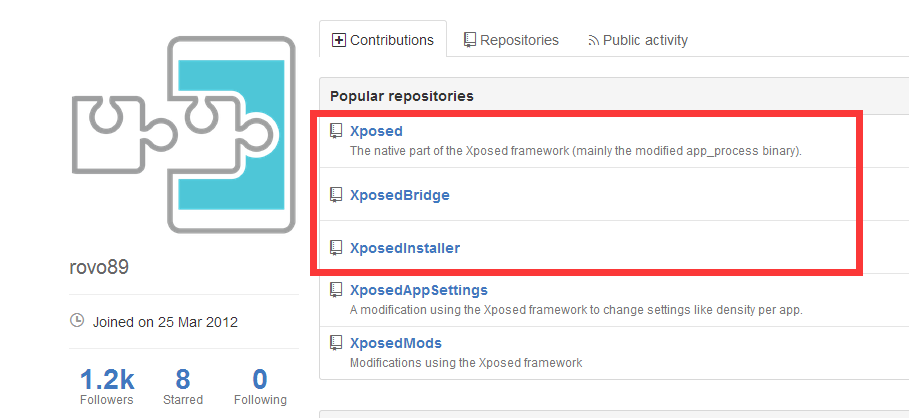
在主页上我们看到了,xposed 其实主要是由三个项目来组成的,如下图所示;
三个分别是:
项目
说明
Xposed
Xposed 框架的 native 部分(主要是改性 app_process 二进制文件)
XposedInstaller
Xposed 框架的 Android 端本地管理,环境架构搭建,以及第三方 module 资源下载的工具。
XposedBridge
Xposed 向开发者提供的 API 与相应的工具类库
XposedInstaller的构成 Xposed 项目使我们最常用的项目,当然,他也是构造 Xposed 的核心部分。
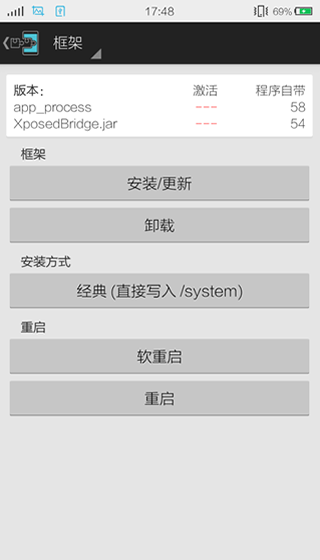
如下图所示,是我们在 XPosedInstaller apk 中见到的,安装 xposed 框架的界面。
InstallerFragment 我们能够在其中找到 install 方法,其中主要就是针对使用不同方式的将自定义的 app_process 文件替换掉系统的 app_process 文件。
1 2 3 4 5 6 7 8 9 10 11 12 13 14 15 16 17 18 19 20 21 22 23 24 25 26 27 28 29 30 31 32 33 34 35 36 37 38 39 40 41 42 43 44 45 46 47 48 49 50 51 52 53 54 55 56 57 58 59 60 61 62 63 64 65 66 67 68 69 70 71 72 73 74 75 76 77 78 79 80 81 82 83 84 85 86 87 88 89 90 91 92 93 94 95 96 97 98 99 100 101 102 103 104 105 106 107 108 109 110 111 112 113 114 115 116 117 118 119 120 121 122 123 124 125 126 private boolean install () { final int installMode = getInstallMode(); if (!startShell()) return false ; List<String> messages = new LinkedList <String>(); boolean showAlert = true ; try { messages.add(getString(R.string.sdcard_location, XposedApp.getInstance().getExternalFilesDir(null ))); messages.add("" ); messages.add(getString(R.string.file_copying, "Xposed-Disabler-Recovery.zip" )); if (AssetUtil.writeAssetToSdcardFile("Xposed-Disabler-Recovery.zip" , 00644 ) == null ) { messages.add("" ); messages.add(getString(R.string.file_extract_failed, "Xposed-Disabler-Recovery.zip" )); return false ; } File appProcessFile = AssetUtil.writeAssetToFile(APP_PROCESS_NAME, new File (XposedApp.BASE_DIR + "bin/app_process" ), 00700 ); if (appProcessFile == null ) { showAlert(getString(R.string.file_extract_failed, "app_process" )); return false ; } if (installMode == INSTALL_MODE_NORMAL) { messages.add(getString(R.string.file_mounting_writable, "/system" )); if (mRootUtil.executeWithBusybox("mount -o remount,rw /system" , messages) != 0 ) { messages.add(getString(R.string.file_mount_writable_failed, "/system" )); messages.add(getString(R.string.file_trying_to_continue)); } if (new File ("/system/bin/app_process.orig" ).exists()) { messages.add(getString(R.string.file_backup_already_exists, "/system/bin/app_process.orig" )); } else { if (mRootUtil.executeWithBusybox("cp -a /system/bin/app_process /system/bin/app_process.orig" , messages) != 0 ) { messages.add("" ); messages.add(getString(R.string.file_backup_failed, "/system/bin/app_process" )); return false ; } else { messages.add(getString(R.string.file_backup_successful, "/system/bin/app_process.orig" )); } mRootUtil.executeWithBusybox("sync" , messages); } messages.add(getString(R.string.file_copying, "app_process" )); if (mRootUtil.executeWithBusybox("cp -a " + appProcessFile.getAbsolutePath() + " /system/bin/app_process" , messages) != 0 ) { messages.add("" ); messages.add(getString(R.string.file_copy_failed, "app_process" , "/system/bin" )); return false ; } if (mRootUtil.executeWithBusybox("chmod 755 /system/bin/app_process" , messages) != 0 ) { messages.add("" ); messages.add(getString(R.string.file_set_perms_failed, "/system/bin/app_process" )); return false ; } if (mRootUtil.executeWithBusybox("chown root:shell /system/bin/app_process" , messages) != 0 ) { messages.add("" ); messages.add(getString(R.string.file_set_owner_failed, "/system/bin/app_process" )); return false ; } } else if (installMode == INSTALL_MODE_RECOVERY_AUTO) { if (!prepareAutoFlash(messages, "Xposed-Installer-Recovery.zip" )) return false ; } else if (installMode == INSTALL_MODE_RECOVERY_MANUAL) { if (!prepareManualFlash(messages, "Xposed-Installer-Recovery.zip" )) return false ; } File blocker = new File (XposedApp.BASE_DIR + "conf/disabled" ); if (blocker.exists()) { messages.add(getString(R.string.file_removing, blocker.getAbsolutePath())); if (mRootUtil.executeWithBusybox("rm " + blocker.getAbsolutePath(), messages) != 0 ) { messages.add("" ); messages.add(getString(R.string.file_remove_failed, blocker.getAbsolutePath())); return false ; } } messages.add(getString(R.string.file_copying, "XposedBridge.jar" )); File jarFile = AssetUtil.writeAssetToFile("XposedBridge.jar" , new File (JAR_PATH_NEWVERSION), 00644 ); if (jarFile == null ) { messages.add("" ); messages.add(getString(R.string.file_extract_failed, "XposedBridge.jar" )); return false ; } mRootUtil.executeWithBusybox("sync" , messages); showAlert = false ; messages.add("" ); if (installMode == INSTALL_MODE_NORMAL) { offerReboot(messages); } else { offerRebootToRecovery(messages, "Xposed-Installer-Recovery.zip" , installMode); } return true ; } finally { AssetUtil.removeBusybox(); if (showAlert) showAlert(TextUtils.join("\n" , messages).trim()); } }
我们看完了代码,发现所有的工作都是为了 app_process 文件的替换。那么,系统中这个 app_process 是做什么的?为什么我们需要替换?替换成什么样?替换后对于我们么来说有什么帮助呢?
Xposed原理 我们在 android 的源码中的 init.rc 文件可以看到
1
2
3
4
5
6
service zygote /system/bin/app_process -Xzygote /system/bin –zygote –start-system-server socket zygote stream 666 onrestart write /sys/android_power/request_state wake onrestart write /sys/power/state on onrestart restart media onrestart restart netd
app_process 是 andriod app 的启动程序(具体形式是 zygote fork() 调用一个 app_process 作为 Android app 的载体)。
Xposed的实现方案 针对 Hook 的不同进程来说又可以分为全局 Hook 与单个应用程序进程 Hook ,我们知道在 Android 系统中,应用程序进程都是由 Zygote 进程孵化出来的,而 Zygote 进程是由 Init 进程启动的。
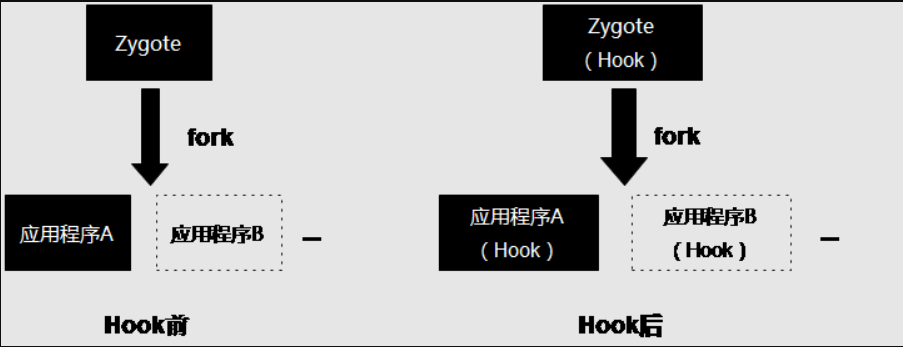
Zygote 进程在启动时会创建一个 Dalvik 虚拟机实例,每当它孵化一个新的应用程序进程时,都会将这个 Dalvik 虚拟机实例复制到新的应用程序进程里面去,从而使得每一个应用程序进程都有一个独立的 Dalvik 虚拟机实例。所以如果选择对 Zygote 进程 Hook ,则能够达到针对系统上所有的应用程序进程 Hook ,即一个全局 Hook 。如下图所示:
Xposed 源码剖析 —— app_process 作用详解 上面我们分析 Xposed 项目的源码,从 XposedInstaller 开始说明了 Xposed 安装的原理与过程。我们知道,XposedInstaller 主要的工作就是:
替换系统的 app_process(当然,这个操作需要 Root 权限)
将 xposed 的 api 文件,XposedBridge.jar 文件放置到私有目录中
至于为什么要替换 app_process 文件?
系统中的 app_process 文件有什么作用?
替换后的 app_process 为什么能够帮助我们hook?
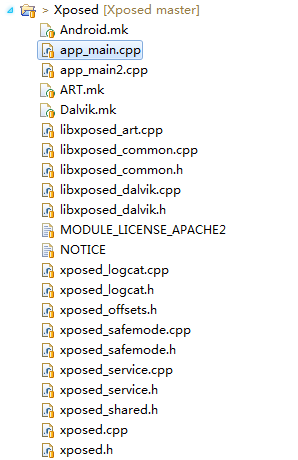
下面我们就开始看看, rovo89 大神的 xposed 开源项目。从 GitHub 上面 clone 下来 xposed 项目,我们在目录中看到其目录结构,如下所示:
从目录中,我们能够清楚的了解到,其中 xposed 项目现在已经支持 Dalvik 虚拟机与 art 虚拟机的架构了。
app_main.cpp 源码阅读与对比我们先从 app_process 的源码开始阅读,打开 app_main.cpp 文件,估计大家和我一下,一时间也看不出来 xposed 针对源码修改了一些什么。
那么,我们就直接拿源码与 xposed 中的 app_main.cpp 进行对比。
源码地址:/frameworks/base/cmds/app_process/app_main.cpp
发现了,rovo89 针对了一下几个地方进行了修改。
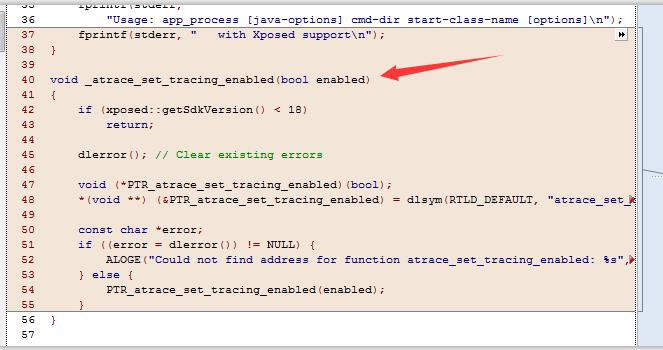
atrace_set_tracing_enabled 进行了替换修改
onVmCreated 增加了 Xposed 的回调
main 函数中,增加了 xposed 的 options 操作
我们在 xposed.cpp 中,能够看到其 handleOptions 的具体逻辑,其实就是处理一些 xposed 的特殊命令而已。如下所示:
1 2 3 4 5 6 7 8 9 10 11 12 13 14 15 16 17 18 19 20 21 22 23 24 25 26 27 28 29 bool handleOptions (int argc, char * const argv[]) parseXposedProp (); if (argc == 2 && strcmp (argv[1 ], "--xposedversion" ) == 0 ) { printf ("Xposed version: %s\n" , xposedVersion); return true ; } if (argc == 2 && strcmp (argv[1 ], "--xposedtestsafemode" ) == 0 ) { printf ("Testing Xposed safemode trigger\n" ); if (detectSafemodeTrigger (shouldSkipSafemodeDelay ())) { printf ("Safemode triggered\n" ); } else { printf ("Safemode not triggered\n" ); } return true ; } argBlockStart = argv[0 ]; uintptr_t start = reinterpret_cast <uintptr_t >(argv[0 ]); uintptr_t end = reinterpret_cast <uintptr_t >(argv[argc - 1 ]); end += strlen (argv[argc - 1 ]) + 1 ; argBlockLength = end - start; return false ; }
main 函数中,启动的时候增加了启动一些逻辑.
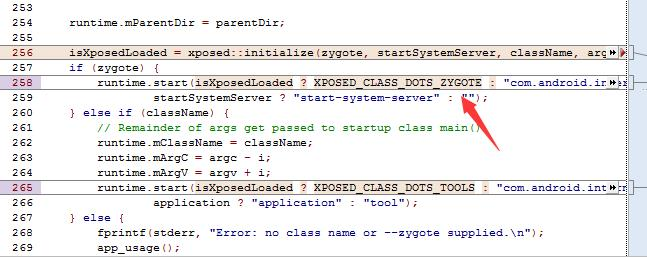
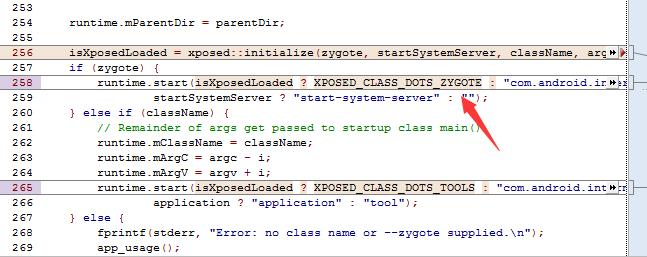
具体的, 我们可以看到。runtime.start 那一段。做出了一个启动。
1
2
3
4
5
6
7
8
9
10
11
12
13
14
15
16
17
18
19
isXposedLoaded = xposed::initialize (zygote, startSystemServer, className, argc, argv); if (zygote) { runtime.start (isXposedLoaded ? XPOSED_CLASS_DOTS_ZYGOTE : "com.android.internal.os.ZygoteInit" , startSystemServer ? "start-system-server" : "" ); } else if (className) { runtime.mClassName = className; runtime.mArgC = argc - i; runtime.mArgV = argv + i; runtime.start (isXposedLoaded ? XPOSED_CLASS_DOTS_TOOLS : "com.android.internal.os.RuntimeInit" , application ? "application" : "tool" ); } else { fprintf (stderr, "Error: no class name or --zygote supplied.\n" ); app_usage (); LOG_ALWAYS_FATAL ("app_process: no class name or --zygote supplied." ); return 10 ; }
这里的我们看到,在 main 函数中启动了逻辑,
1
2
runtime.start(isXposedLoaded ? XPOSED_CLASS_DOTS_ZYGOTE : "com.android.internal.os.ZygoteInit", startSystemServer ? "start-system-server" : "");
其中, XPOSED_CLASS_DOTS_ZYGOTE 变量在,xposed.h 头文件中有定义,如下所示:
1 #define XPOSED_CLASS_DOTS_ZYGOTE "de.robv.android.xposed.XposedBridge"
其实这个类就是我们之前向私有目录防止的 XposedBridge 项目的包名。
而 runtime.start 这个包名有什么作用呢?我们在 AndroidRuntime 中找到 start 方法的具体逻辑。
在源代码中/frameworks/base/core/jni/AndroidRuntime.cpp中看到
1 2 3 4 5 6 7 8 9 void AndroidRuntime::start (const char * className, const char * options)
系统源码对 start 方法的定义,就是启动对应类的 start void main 入口函数。这里,就将三个项目的逻辑连接起来了。
XposedBridge.java 我们在 XposedBridge.java 代码中,看到其 main 方法,如下所示:
1 2 3 4 5 6 7 8 9 10 11 12 13 14 15 16 17 18 19 20 21 22 23 24 25 26 27 28 29 30 31 32 33 34 protected static void main (String[] args) { try { SELinuxHelper.initOnce(); SELinuxHelper.initForProcess(null ); runtime = getRuntime(); if (initNative()) { XPOSED_BRIDGE_VERSION = getXposedVersion(); if (isZygote) { startsSystemServer = startsSystemServer(); initForZygote(); } loadModules(); } else { log("Errors during native Xposed initialization" ); } } catch (Throwable t) { log("Errors during Xposed initialization" ); log(t); disableHooks = true ; } if (isZygote) ZygoteInit.main(args); else RuntimeInit.main(args); }
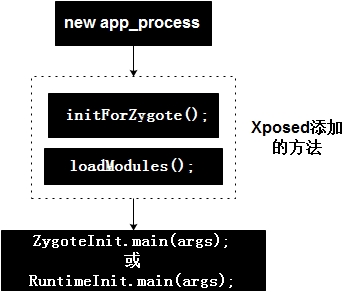
那么,整个 app_process 的复制 hook 逻辑,到这里我们已经清楚了。逻辑如下图所示。
那么,xposed 具体怎么实现系统 api 逻辑的 replace 和 inject 我们下次在做分析。
Xposed源码剖析——Xposed初始化 之前我们看过了 app_main.cpp 源码,知道了在其中,启动了 XposedBridge.jar 方法。那么,其中还做了些什么事情呢?
之前我们也看到了在 app_main.cpp 还有几处新增的逻辑。xposed::initialize和onVmCreated回调。下面我在仔细的阅读以下源码。
xposed::initialize初始化 对于 xposed::initalize 的初始化工作,我们能够在 xposed.cpp 中看到其具体的逻辑实现。
1 2 3 4 5 6 7 8 9 10 11 12 13 14 15 16 17 18 19 20 21 22 23 24 25 26 27 28 29 30 31 32 33 34 35 36 37 38 39 40 41 42 43 44 45 46 47 48 49 50 51 52 53 54 bool initialize (bool zygote, bool startSystemServer, const char * className, int argc, char * const argv[]) #if !defined(XPOSED_ENABLE_FOR_TOOLS) if (!zygote) return false ; #endif xposed->zygote = zygote; xposed->startSystemServer = startSystemServer; xposed->startClassName = className; xposed->xposedVersionInt = xposedVersionInt; #if XPOSED_WITH_SELINUX xposed->isSELinuxEnabled = is_selinux_enabled () == 1 ; xposed->isSELinuxEnforcing = xposed->isSELinuxEnabled && security_getenforce () == 1 ; #else xposed->isSELinuxEnabled = false ; xposed->isSELinuxEnforcing = false ; #endif if (startSystemServer) { xposed::logcat::start (); } else if (zygote) { sleep (10 ); } printRomInfo (); if (startSystemServer) { if (!xposed::service::startAll ()) return false ; #if XPOSED_WITH_SELINUX } else if (xposed->isSELinuxEnabled) { if (!xposed::service::startMembased ()) return false ; #endif } if (zygote && !isSafemodeDisabled () && detectSafemodeTrigger (shouldSkipSafemodeDelay ())) disableXposed (); if (isDisabled () || (!zygote && shouldIgnoreCommand (argc, argv))) return false ; return addJarToClasspath (); }
onVmCreated 初始化后的准备工作 其具体的逻辑如下所示:
1 2 3 4 5 6 7 8 9 10 11 12 13 14 15 16 17 18 19 20 21 22 23 24 25 26 27 28 29 30 31 32 33 34 35 36 37 38 39 40 41 42 void onVmCreated (JNIEnv* env) const char * xposedLibPath = NULL ; if (!determineRuntime (&xposedLibPath)) { ALOGE ("Could not determine runtime, not loading Xposed" ); return ; } const char *error; void * xposedLibHandle = dlopen (xposedLibPath, RTLD_NOW); if (!xposedLibHandle) { ALOGE ("Could not load libxposed: %s" , dlerror ()); return ; } dlerror (); bool (*xposedInitLib)(XposedShared* shared) = NULL ; *(void **) (&xposedInitLib) = dlsym (xposedLibHandle, "xposedInitLib" ); if (!xposedInitLib) { ALOGE ("Could not find function xposedInitLib" ); return ; } #if XPOSED_WITH_SELINUX xposed->zygoteservice_accessFile = &service::membased::accessFile; xposed->zygoteservice_statFile = &service::membased::statFile; xposed->zygoteservice_readFile = &service::membased::readFile; #endif if (xposedInitLib (xposed)) { xposed->onVmCreated (env); } }
libxposed_dalvik.cpp hook 环境初始化1 2 3 4 5 6 7 8 9 10 11 12 13 14 15 16 17 18 19 20 21 22 23 24 25 26 27 28 29 30 31 32 33 34 35 36 37 38 39 40 41 42 43 44 45 46 47 48 49 50 51 52 53 54 55 56 57 58 59 bool xposedInitLib (xposed::XposedShared* shared) xposed = shared; xposed->onVmCreated = &onVmCreated; return true ; } void onVmCreated (JNIEnv* env) if (!initMemberOffsets (env)) return ; jclass classMiuiResources = env->FindClass (CLASS_MIUI_RESOURCES); if (classMiuiResources != NULL ) { ClassObject* clazz = (ClassObject*)dvmDecodeIndirectRef (dvmThreadSelf (), classMiuiResources); if (dvmIsFinalClass (clazz)) { ALOGD ("Removing final flag for class '%s'" , CLASS_MIUI_RESOURCES); clazz->accessFlags &= ~ACC_FINAL; } } env->ExceptionClear (); jclass classXTypedArray = env->FindClass (CLASS_XTYPED_ARRAY); if (classXTypedArray == NULL ) { ALOGE ("Error while loading XTypedArray class '%s':" , CLASS_XTYPED_ARRAY); dvmLogExceptionStackTrace (); env->ExceptionClear (); return ; } prepareSubclassReplacement (classXTypedArray); classXposedBridge = env->FindClass (CLASS_XPOSED_BRIDGE); classXposedBridge = reinterpret_cast <jclass>(env->NewGlobalRef (classXposedBridge)); if (classXposedBridge == NULL ) { ALOGE ("Error while loading Xposed class '%s':" , CLASS_XPOSED_BRIDGE); dvmLogExceptionStackTrace (); env->ExceptionClear (); return ; } ALOGI ("Found Xposed class '%s', now initializing" , CLASS_XPOSED_BRIDGE); if (register_natives_XposedBridge (env, classXposedBridge) != JNI_OK) { ALOGE ("Could not register natives for '%s'" , CLASS_XPOSED_BRIDGE); dvmLogExceptionStackTrace (); env->ExceptionClear (); return ; } xposedLoadedSuccessfully = true ; }
JNI方法注册逻辑 这里注册的几个方法都是,Xposed 核心的几个方法函数。
1 2 3 4 5 6 7 8 9 10 11 12 13 14 15 16 17 18 19 20 21 22 23 24 int register_natives_XposedBridge (JNIEnv* env, jclass clazz) const JNINativeMethod methods[] = { NATIVE_METHOD (XposedBridge, getStartClassName, "()Ljava/lang/String;" ), NATIVE_METHOD (XposedBridge, getRuntime, "()I" ), NATIVE_METHOD (XposedBridge, startsSystemServer, "()Z" ), NATIVE_METHOD (XposedBridge, getXposedVersion, "()I" ), NATIVE_METHOD (XposedBridge, initNative, "()Z" ), NATIVE_METHOD (XposedBridge, hookMethodNative, "(Ljava/lang/reflect/Member;Ljava/lang/Class;ILjava/lang/Object;)V" ), #ifdef ART_TARGET NATIVE_METHOD (XposedBridge, invokeOriginalMethodNative, "(Ljava/lang/reflect/Member;I[Ljava/lang/Class;Ljava/lang/Class;Ljava/lang/Object;[Ljava/lang/Object;)Ljava/lang/Object;" ), #endif NATIVE_METHOD (XposedBridge, setObjectClassNative, "(Ljava/lang/Object;Ljava/lang/Class;)V" ), NATIVE_METHOD (XposedBridge, dumpObjectNative, "(Ljava/lang/Object;)V" ), NATIVE_METHOD (XposedBridge, cloneToSubclassNative, "(Ljava/lang/Object;Ljava/lang/Class;)Ljava/lang/Object;" ), }; return env->RegisterNatives (clazz, methods, NELEM (methods)); }
我们看到 RegisterNatives 这个方法的时候不是很理解,这里做一个简介。
以前在 jni 中写本地方法时,都会写成 Java_com_example_hellojni_HelloJni_stringFromJNI 的形式,函数名很长,而且当类名变了的时候,函数名必须一个一个的改,麻烦。
现在好了有了 RegisterNatives ,可以简化我们的书写
C++中函数命名自由,不必像 javah 自动生成的函数声明那样,拘泥特定的命名方式;
效率高。传统方式下,Java 类 call 本地函数时,通常是依靠 VM 去动态寻找 .so 中的本地函数(因此它们才需要特定规则的命名格式),而使用 RegisterNatives 将本地函数向 VM 进行登记,可以让其更有效率的找到函数;
运行时动态调整本地函数与 Java 函数值之间的映射关系,只需要多次 call RegisterNatives() 方法,并传入不同的映射表参数即可。
Xposed 源码剖析—— hook 具体实现 之前我们看到了 xposed 各种初始化的工作,其实都是完成了针对系统中各种 method 的 hook 和替换工作。
那么具体如何替换,其实都是调用了其中的。 XposedBridge_hookMethodNative 函数。这里,我们详细的看看 XposedBridge_hookMethodNative 函数中,做了一些什么操作。
1 2 3 4 5 6 7 8 9 10 11 12 13 14 15 16 17 18 19 20 21 22 23 24 25 26 27 28 29 30 31 32 33 34 35 36 37 38 39 40 41 42 43 44 45 46 47 48 49 50 51 52 53 54 55 void XposedBridge_hookMethodNative (JNIEnv* env, jclass clazz, jobject reflectedMethodIndirect, jobject declaredClassIndirect, jint slot, jobject additionalInfoIndirect) if (declaredClassIndirect == NULL || reflectedMethodIndirect == NULL ) { dvmThrowIllegalArgumentException ("method and declaredClass must not be null" ); return ; } ClassObject* declaredClass = (ClassObject*) dvmDecodeIndirectRef (dvmThreadSelf (), declaredClassIndirect); Method* method = dvmSlotToMethod (declaredClass, slot); if (method == NULL ) { dvmThrowNoSuchMethodError ("Could not get internal representation for method" ); return ; } if (isMethodHooked (method)) { return ; } XposedHookInfo* hookInfo = (XposedHookInfo*) calloc (1 , sizeof (XposedHookInfo)); memcpy (hookInfo, method, sizeof (hookInfo->originalMethodStruct)); hookInfo->reflectedMethod = dvmDecodeIndirectRef (dvmThreadSelf (), env->NewGlobalRef (reflectedMethodIndirect)); hookInfo->additionalInfo = dvmDecodeIndirectRef (dvmThreadSelf (), env->NewGlobalRef (additionalInfoIndirect)); SET_METHOD_FLAG (method, ACC_NATIVE); method->nativeFunc = &hookedMethodCallback; method->insns = (const u2*) hookInfo; method->registersSize = method->insSize; method->outsSize = 0 ; if (PTR_gDvmJit != NULL ) { char currentValue = *((char *)PTR_gDvmJit + MEMBER_OFFSET_VAR (DvmJitGlobals,codeCacheFull)); if (currentValue == 0 || currentValue == 1 ) { MEMBER_VAL (PTR_gDvmJit, DvmJitGlobals, codeCacheFull) = true ; } else { ALOGE ("Unexpected current value for codeCacheFull: %d" , currentValue); } } }
对 vm 不熟悉的,解释一下几个不怎么常用的函数。
名称
说明
dvmDecodeIndirectRef
将间接引用 jobject 转换为对象引用 Object*
dvmSlotToMethod
根据偏移量,从 ClassLoader 中获取函数指针
1 2 3 4 5 6 7 8 9 10 11 12 13 14 15 16 17 18 19 20 21 22 23 24 25 26 27 28 29 30 31 32 33 34 35 36 37 38 39 40 41 42 43 44 45 46 47 48 49 50 51 52 53 54 55 56 57 58 59 60 61 62 63 64 65 66 67 68 69 70 71 72 73 74 75 76 77 78 79 80 81 82 83 84 85 86 87 88 89 90 91 92 93 void hookedMethodCallback (const u4* args, JValue* pResult, const Method* method, ::Thread* self) if (!isMethodHooked (method)) { dvmThrowNoSuchMethodError ("Could not find Xposed original method - how did you even get here?" ); return ; } XposedHookInfo* hookInfo = (XposedHookInfo*) method->insns; Method* original = (Method*) hookInfo; Object* originalReflected = hookInfo->reflectedMethod; Object* additionalInfo = hookInfo->additionalInfo; const char * desc = &method->shorty[1 ]; Object* thisObject = NULL ; size_t srcIndex = 0 ; size_t dstIndex = 0 ; if (!dvmIsStaticMethod (original)) { thisObject = (Object*) args[0 ]; srcIndex++; } ArrayObject* argsArray = dvmAllocArrayByClass (objectArrayClass, strlen (method->shorty) - 1 , ALLOC_DEFAULT); if (argsArray == NULL ) { return ; } while (*desc != '\0' ) { char descChar = *(desc++); JValue value; Object* obj; switch (descChar) { case 'Z' : case 'C' : case 'F' : case 'B' : case 'S' : case 'I' : value.i = args[srcIndex++]; obj = (Object*) dvmBoxPrimitive (value, dvmFindPrimitiveClass (descChar)); dvmReleaseTrackedAlloc (obj, self); break ; case 'D' : case 'J' : value.j = dvmGetArgLong (args, srcIndex); srcIndex += 2 ; obj = (Object*) dvmBoxPrimitive (value, dvmFindPrimitiveClass (descChar)); dvmReleaseTrackedAlloc (obj, self); break ; case '[' : case 'L' : obj = (Object*) args[srcIndex++]; break ; default : ALOGE ("Unknown method signature description character: %c" , descChar); obj = NULL ; srcIndex++; } setObjectArrayElement (argsArray, dstIndex++, obj); } JValue result; dvmCallMethod (self, xposedHandleHookedMethod, NULL , &result, originalReflected, (int ) original, additionalInfo, thisObject, argsArray); dvmReleaseTrackedAlloc (argsArray, self); if (dvmCheckException (self)) { return ; } ClassObject* returnType = dvmGetBoxedReturnType (method); if (returnType->primitiveType == PRIM_VOID) { } else if (result.l == NULL ) { if (dvmIsPrimitiveClass (returnType)) { dvmThrowNullPointerException ("null result when primitive expected" ); } pResult->l = NULL ; } else { if (!dvmUnboxPrimitive (result.l, returnType, pResult)) { dvmThrowClassCastException (result.l->clazz, returnType); } } }
转载:https://blog.csdn.net/yzzst/article/details/47659987
