dexsim简介 dexsim 是利用动态调用实现字符串解密的工具,需要配合 DSS 使用。作者为 mikusjelly 。
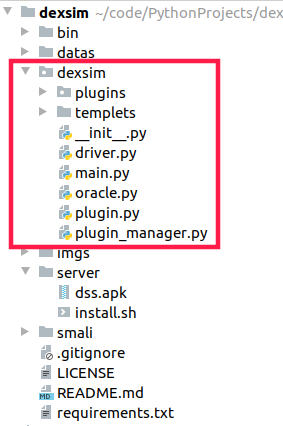
dexsim 源码浅析 dexsim 源码结构如下图所示,
其中关键解密方法在 dexsim/Plugins 中,当我们需要添加一个解密方法时直接在该目录中添加对应插件既可。
首先来看 main 方法
1
2
3
4
5
6
7
8
9
10
11
12
13
14
15
16
17
18
if __name__ == "__main__": parser = argparse.ArgumentParser(prog='dexsim', description='') parser.add_argument('f', help='APK 文件') parser.add_argument('-i', '--includes', nargs='*', help='仅解密包含的类,如abc, a.b.c') parser.add_argument('-o', help='output file path') parser.add_argument('-d', '--debug', action='store_true', help='开启调试模式') parser.add_argument('-s', required=False, help='指定smali目录') parser.add_argument('-p', '--pname', required=False, help='加载指定插件,根据插件名字') # TODO parser.add_argument('-b', action='store_true', help='开启STEP_BY_STEP插件') args = parser.parse_args() start = time.time() main(args) finish = time.time() print('\n%fs' % (finish - start))
该方法主要是解析参数
-i 仅解密包含的类 参数格式为 a.b.c a.b, 后面会将其转换为 a/b/c.smali a/b.smali 。
-o 解密后输出文件的路径
-s 指定smali目录
-p 加载指定插件,根据插件名字
在 main() 方法中,将 apk 中的多个 dex 合并为一个名为 new.dex 文件
1
2
3
4
5
6
7
8
9
10
ptn = re.compile(r'classes\d*.dex') zipFile = zipfile.ZipFile(apk_path) for item in zipFile.namelist(): if ptn.match(item): output_path = zipFile.extract(item, tempdir) baksmali(output_path, smali_dir) zipFile.close() dex_file = os.path.join(tempdir, 'new.dex')
然后在使用 smali 将合并的 dex 转为 samli 文件, 并进一步解析。
1
2
smali(smali_dir, dex_file) dexsim_apk(args.f, smali_dir, includes, output_dex)
上面的方法可以进行一下优化,没有必要将合并的 dex 进行反编译为 smali 文件,并且只能针对 apk 文件进行解密,可以增加对 dex 文件的解密。
接着看 dexsim_apk 方法.
1
2
3
4
5
6
dexsim(apk_file, smali_dir, includes) if output_dex: smali(smali_dir, output_dex) else: smali(smali_dir, os.path.splitext(os.path.basename(apk_file))[0] + '.sim.dex')
发现该方法直接调用 dexsim 方法,然后解密完成,那么关键方法为 dexsim。
1
2
3
4
5
6
7
8
9
10
11
12
13
def dexsim(apk_file, smali_dir, includes): """推送到手机/模拟器,动态解密 Args: apk_file (TYPE): Description smali_dir (TYPE): Description includes (TYPE): Description """ driver = Driver() driver.push_to_dss(apk_file) oracle = Oracle(smali_dir, driver, includes) oracle.divine()
在该方法中将 dex 文件推送到手机中,然后调用创建 Oracle 对象向,调用该对象的 divine 进行解密.
接下来看 Oracle 对象的 __init__ 方法
1
2
3
4
5
6
7
8
9
10
11
12
def __init__(self, smali_dir, driver, includes): ''' ''' self.driver = driver # 下面一段代码可以删除,因为我们传的includes参数已经去掉了 L paths = [] if includes: for item in includes: paths.append(item[1:].split(';')[0]) self.smalidir = SmaliDir(smali_dir, include=paths, exclude=FILTERS) self.plugin_manager = PluginManager(self.driver, self.smalidir)
调用 SmaliDir 读取 smali 代码, 然后调用 PluginManager 加载插件。
接下来看看 PluginManager 如何加载所有插件的
1
2
3
4
5
6
7
8
9
10
11
12
13
14
15
16
17
18
19
20
21
22
23
24
25
def __init__plugins(self): for path in sys.path: if path and path in __file__: pkg = __file__.replace(path, '') break module_path = os.path.dirname(pkg)[1:].replace( os.sep, '.') + '.' + self.plugin_dir + '.' tmp = [None] * len(self.plugin_filenames) # 开始加载所有插件 for name in self.plugin_filenames: spec = importlib.util.find_spec(module_path + name) mod = spec.loader.load_module() clazz = getattr(mod, mod.PLUGIN_CLASS_NAME) if not issubclass(clazz, Plugin): continue if not clazz.enabled: print("Don't load plugin", clazz.name) continue tmp[clazz.index] = clazz(self.driver, self.smalidir) for item in tmp: if item: self.__plugins.append(item)
首先获取插件名,然后调用 importlib.util.find_spec(module_path + name) 加载插件,完成插件的加载。
接下来回到 oracle.divine() 方法
1
2
3
4
5
6
7
8
9
10
11
12
13
14
15
16
17
def divine(self): plugins = self.plugin_manager.get_plugins() flag = True smali_mtds = set() # 存放已被修改的smali方法 while flag: flag = False for plugin in plugins: # 调用插件的run方法 plugin.run() # 更新smali_mtds 文件 smali_mtds = smali_mtds.union(plugin.smali_mtd_updated_set) print(plugin.make_changes) flag = flag | plugin.make_changes plugin.make_changes = False self.driver.adb.run_shell_cmd(['rm', DSS_APK_PATH])
关键的加密方法还是要看插件。
接下来看 Plugin 类,该类是所有插件的基类。先看看两个关键的成员变量
1
2
3
4
5
6
# [{'className':'', 'methodName':'', 'arguments':'', 'id':''}, ..., ] json_list = [] # 存放解密对象 # [(mtd, old_content, new_content), ..., ] # [(方法体, 原始的内容,解密后的内容),...,] target_contexts = {}
json_list 存放解密对象,将转成文件推送到手机中让 DSS 解析并动态执行,其格式如下
1
2
3
4
5
6
7
8
9
10
11
12
[{ "className": "othn.iclauncher", "methodName": "Ez", "arguments": ["java.lang.String:FK9FD0004670751372201EA6"], "id": "a439b0d815c9a0a972c6b0dc69ec7bee5663ae9b65294b2828fbb8aaa098ce70" }, { "className": "othn.iclauncher", "methodName": "EA", "arguments": ["java.lang.String:FKBEFCC3DA309EDA1B6FC62DF7E3EBECB5"], "id": "cdfcbfd5a872408ba4cc06b6f5a1fb48f1c5e18d5c36deb6e6fe41bd6b3d5c8c" }, ]
target_contexts 存放解密前后的代码和方法体,方便后续替换。
几个关键的成员变量高清楚之后,剩下的东西也比较好理解,所以就不多说了,最后就是看看替换方法体
1
2
3
4
5
6
7
8
9
10
11
12
13
for key, value in outputs.items(): if key not in self.target_contexts: print(key, value, "not in") continue for mtd, old_content, new_content in self.target_contexts[key]: old_body = mtd.get_body() new_content = old_content + "\n" + new_content.format(value[0]) body = old_body.replace(old_content, new_content) mtd.set_body(body) self.make_changes = True self.smali_files_update()
outputs 为动态执行后的结果,主要格式如下:
1
2
3
4
5
6
{ "7b842f01264dc1d1a5089da9e86f531e90f5affe9ef36ecade2e2878a306ae7a": ["sender"], "5f0edfa5e4249ff38f5918e9b27197aec7aaeeed6c7c604a109bdfb21d9b7dc5": ["ss"], "642ed422a84d5ccab9e8fb27813c17d80b346af15295ffdc72dbd09d8662e34c": ["raw_data"], "e19e1215be04291d5a0c61232a7ae933a3ad6c6e760e7b86ccc2800f0350730a": ["SUCCEED"], }
通过相同的key进行替换,上面为了避免回编译为dex文件的时报错,直接使用的追加方式。
整个代码的原理大概就是这样,关键就是写插件,这一块就不详细说了,有兴趣可以看看 Plugin 目录中的插件.
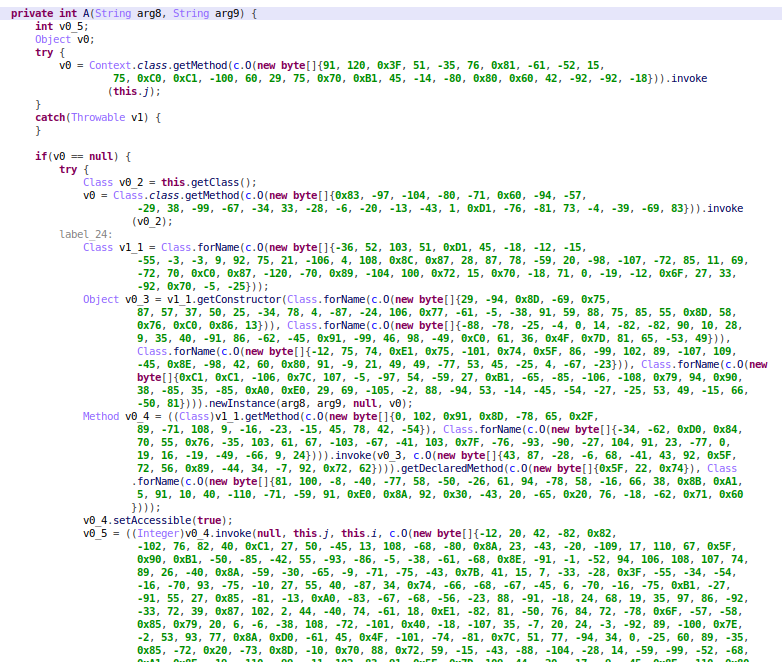
最后看看解密后的效果吧。
解密前
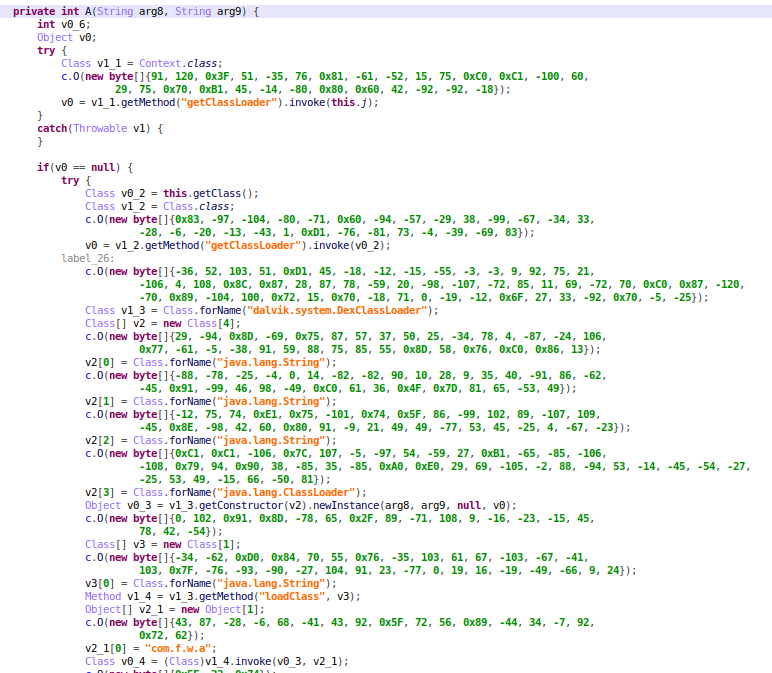
解密后