Android抓包
Android 抓包
使用 Charles 抓包
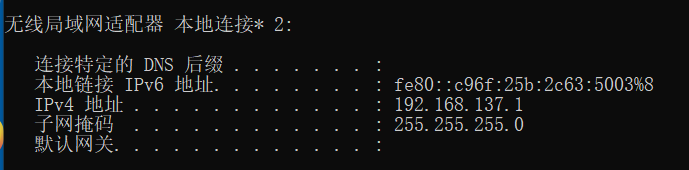
- PC 端共享无线网络,使用
ipconfig命令查看 ip 地址:
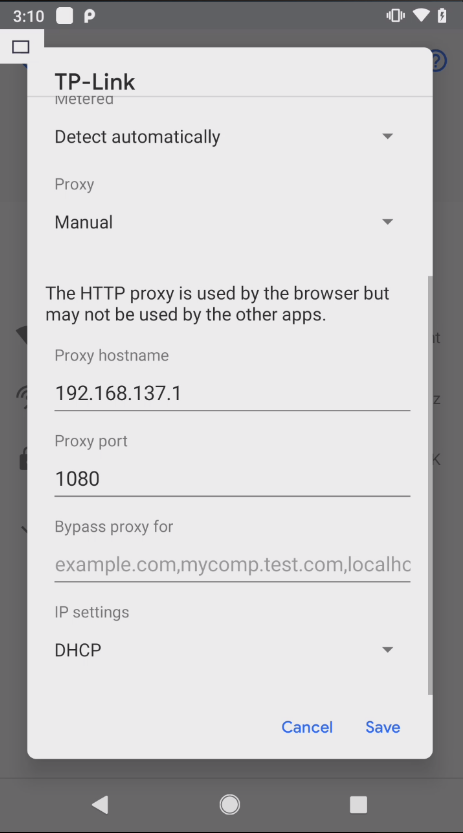
- 手机端设置代理
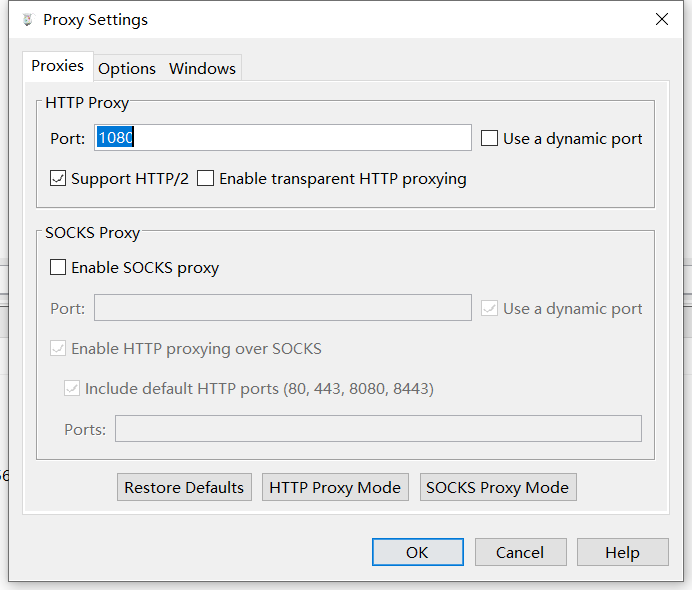
- 抓包工具设置代理
- 安装证书
手机端访问 chls.pro/ssl 下载证书并安装。其中可以通过 Magisk 插件 MoveCertificate 将证书从用户证书移动到系统证书。后续即可进行抓包了。 如果无法进行抓包,尝试一下关闭 Windows 防火墙。
brup 配置好代理后,下载证书地址 http://burp 。
brup 通过 Proxy Setttings -> Import /export CA certificate 导出 Certificate in DER format 的证书,然后再通过手机安装该证书后却无法抓 https 数据包,提示你的连接不是私密连接 NET::ERR_CERT_AUTHORITY_INVALID 。
如果系统为 Android 7 以下的版本,可以手动将用户证书移动到系统证书。
1 | # 挂载根目录,正常情况下,使其可读写 |
Android 7 以上的版本,可以使用下列脚本临时移动证书到系统证书。
1 | set -e # Fail on error |
上面的脚本来自 httptoolkit 。
VPN 配合 Charles 抓包
Charles 设置
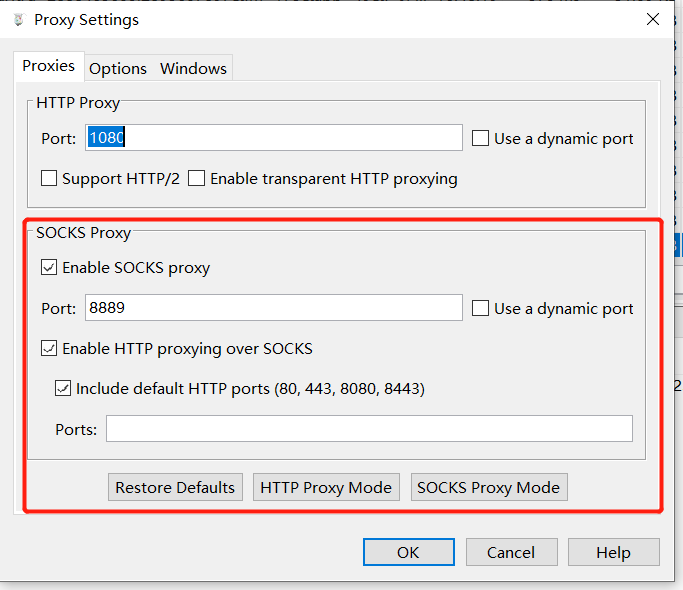
首先要把 Charles 当做一个 SOCKS5 的代理服务器,所以要先设置 SOCKS5 代理服务器。打开 Proxy 设置选项,开启 SOCKS 服务器,我这里开启的端口为 8889 ,也可以随意填写。
下面介绍 3 款手机端的 VPN 应用。
SocksDroid 设置
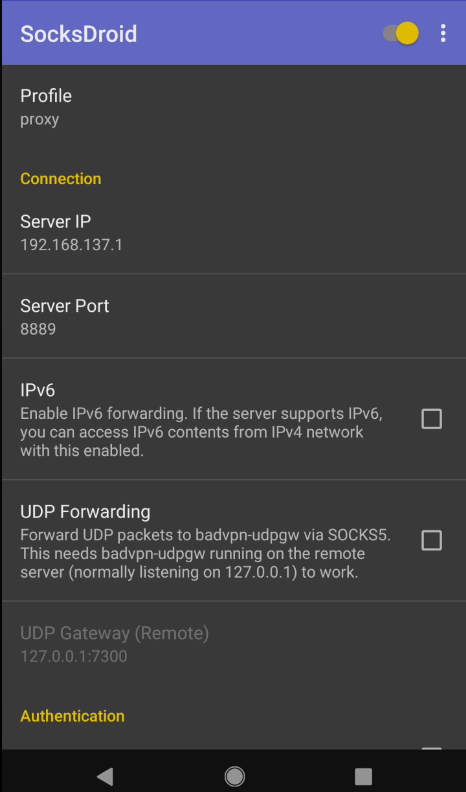
这里还有另一款 VPN 工具 SocksDroid 可以使用,这里也顺便说一下其配置方法,除了设置服务器 IP 和端口外,还需要设置一下 DNS 服务器,以适应国内网络环境。

HTTP/HTTPS 转发到 Burp Suite
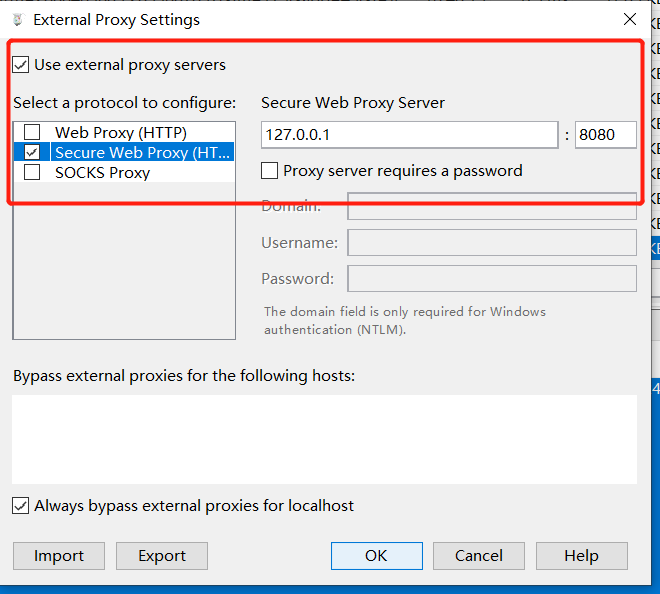
在 Charles 中,打开 External Proxy Settings 选项卡,选择把数据转到 Burp Suite 的代理服务器中。
Windows 虚拟机抓包
Charles 安装在物理机上。
- 首先保存证书
在 Charles 菜单栏选择Help -> SSL proxying -> Save Charles Root Certificate保存证书,其中证书格式为.cer。
然后将证书拖入虚拟中,直接双击安装,将证书存储改为:受信任的根证书颁发机构。
设置代理
将虚拟机的代理设置为物理机的 IP,并且将代理端口设置为 Charles 的代理端口。其中设置代理的位置在:所有设置 -> 网络和 Internet -> 代理 -> 手动设置代理。设置 Charles
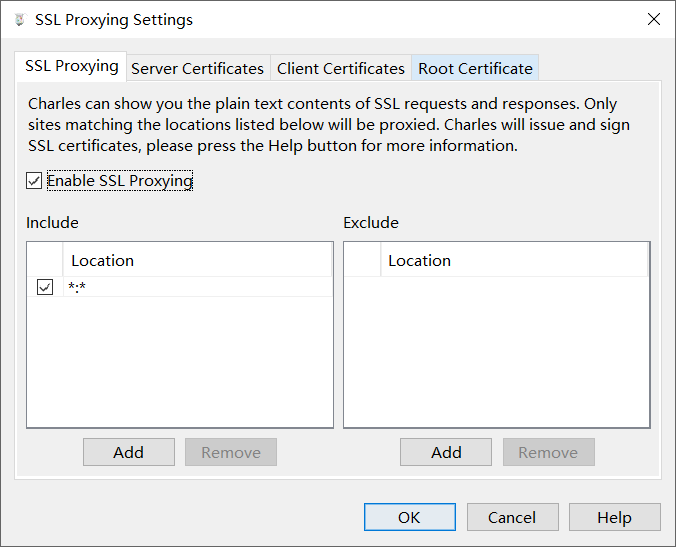
在 Charles 菜单栏选择Proxy -> SSL Proxying Settings -> SSL Proxying,选中 Enable SSL Proxying,并且在 Include 选项添加 Location,Host 和 Port 都设置为*。
Chrome访问提示不安全的网站
Chrome浏览器对证书的信任策略一直在变化,比如最新版本的Chrome浏览器会忽略安装到Android系统证书目录的自签CA证书,如果需要对Chrome浏览器进行抓包,请按照下面的方式进行处理:
- 如果是高版本Chrome浏览器,需要将CA证书安装到用户证书目录;
- 如果是低版本的Chrome浏览器,需要将CA证书安装到系统证书目录。
如果不确定选用那种方式,可以分别尝试下。
Firefox访问提示不安全的网站
Firefox浏览器使用内置的CA Store,系统安装的CA证书无法生效,需要在Firefox调试菜单中启用信任。
- Firefox设置 -> 关于Firefox -> 点击顶部Logo 5下启用调试菜单。
- Firefox设置 -> Secret Settings -> 启用 Use third party CA certificates。
微信抓包
首先用数据线把手机连接到电脑。
手机打开 USB 调试。
手机进入微信随便打开一个聊天窗口输入并发送:
http://debugxweb.qq.com/?inspector=true点击打开这个链接,弹出“执行成功”,即可。手机微信打开想要抓包调试的网页。
电脑上打开 chrome 内核的浏览器或 edge 浏览器。
chrome 内核的浏览器输入chrome://inspect/#devices
edge 浏览器输入:edge://inspect/#devices
打开后稍等片刻,然后在打开的界面中点击 inspect fallback 。
参考连接:
https://mp.weixin.qq.com/s/ahPbBSfkkBsv4oy265rI2Q
https://www.cnblogs.com/lulianqi/p/11380794.html